

About
Capabilities
Brippo extension for Magento Open Source & Adobe Commerce platforms provides a variety of payment methods and integrations including:
- Wallet Express Button from product page, minicart, cart or checkout, supporting Apple Pay, Google Pay and Stripe Link.
- Checkout Form from checkout, supporting direct Credit/Debit card, Apple Pay, Google Pay and Stripe Link.
- Pay by Link supporting Credit/Debit, Apple Pay and Google Pay and Stripe Link from Stripe-hosted checkout. Reserve order, pay later.
- POS Terminal supporting Credit/Debit, Apple Pay and Google Pay and Stripe Link using Stripe Terminal.
- POS Pay by Link supporting Credit/Debit, Apple Pay and Google Pay and Stripe Link from Stripe-hosted checkout. Reserve order, pay later.
Brippo Payments is also available in WooCommerce for Wordpress, currently compatible with Wallet Express Button and Checkout Form.
Demo store
Visit our demo store, featuring a Magento Open Source vanilla install with all our available frontend payment methods.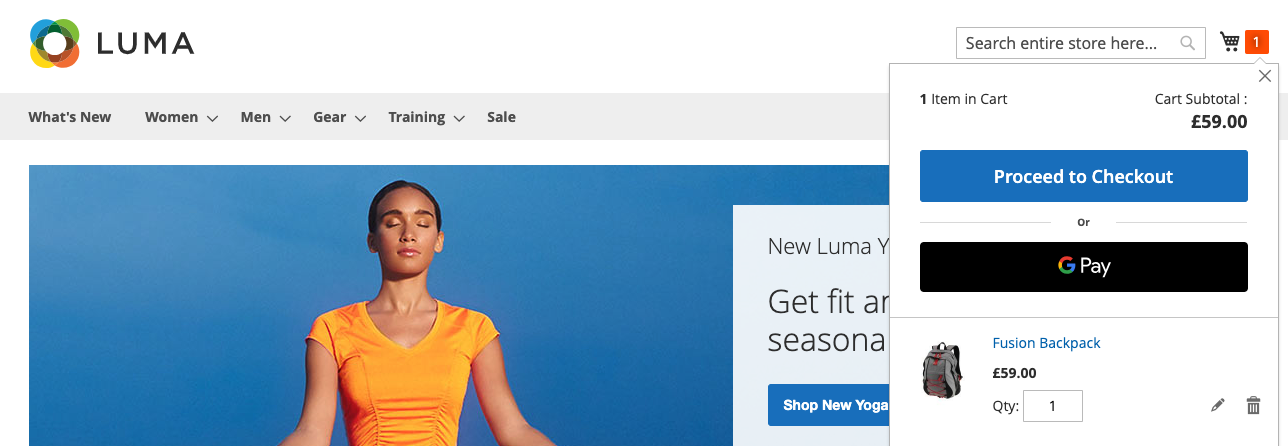

You can also visit our WooCommerce demo store below.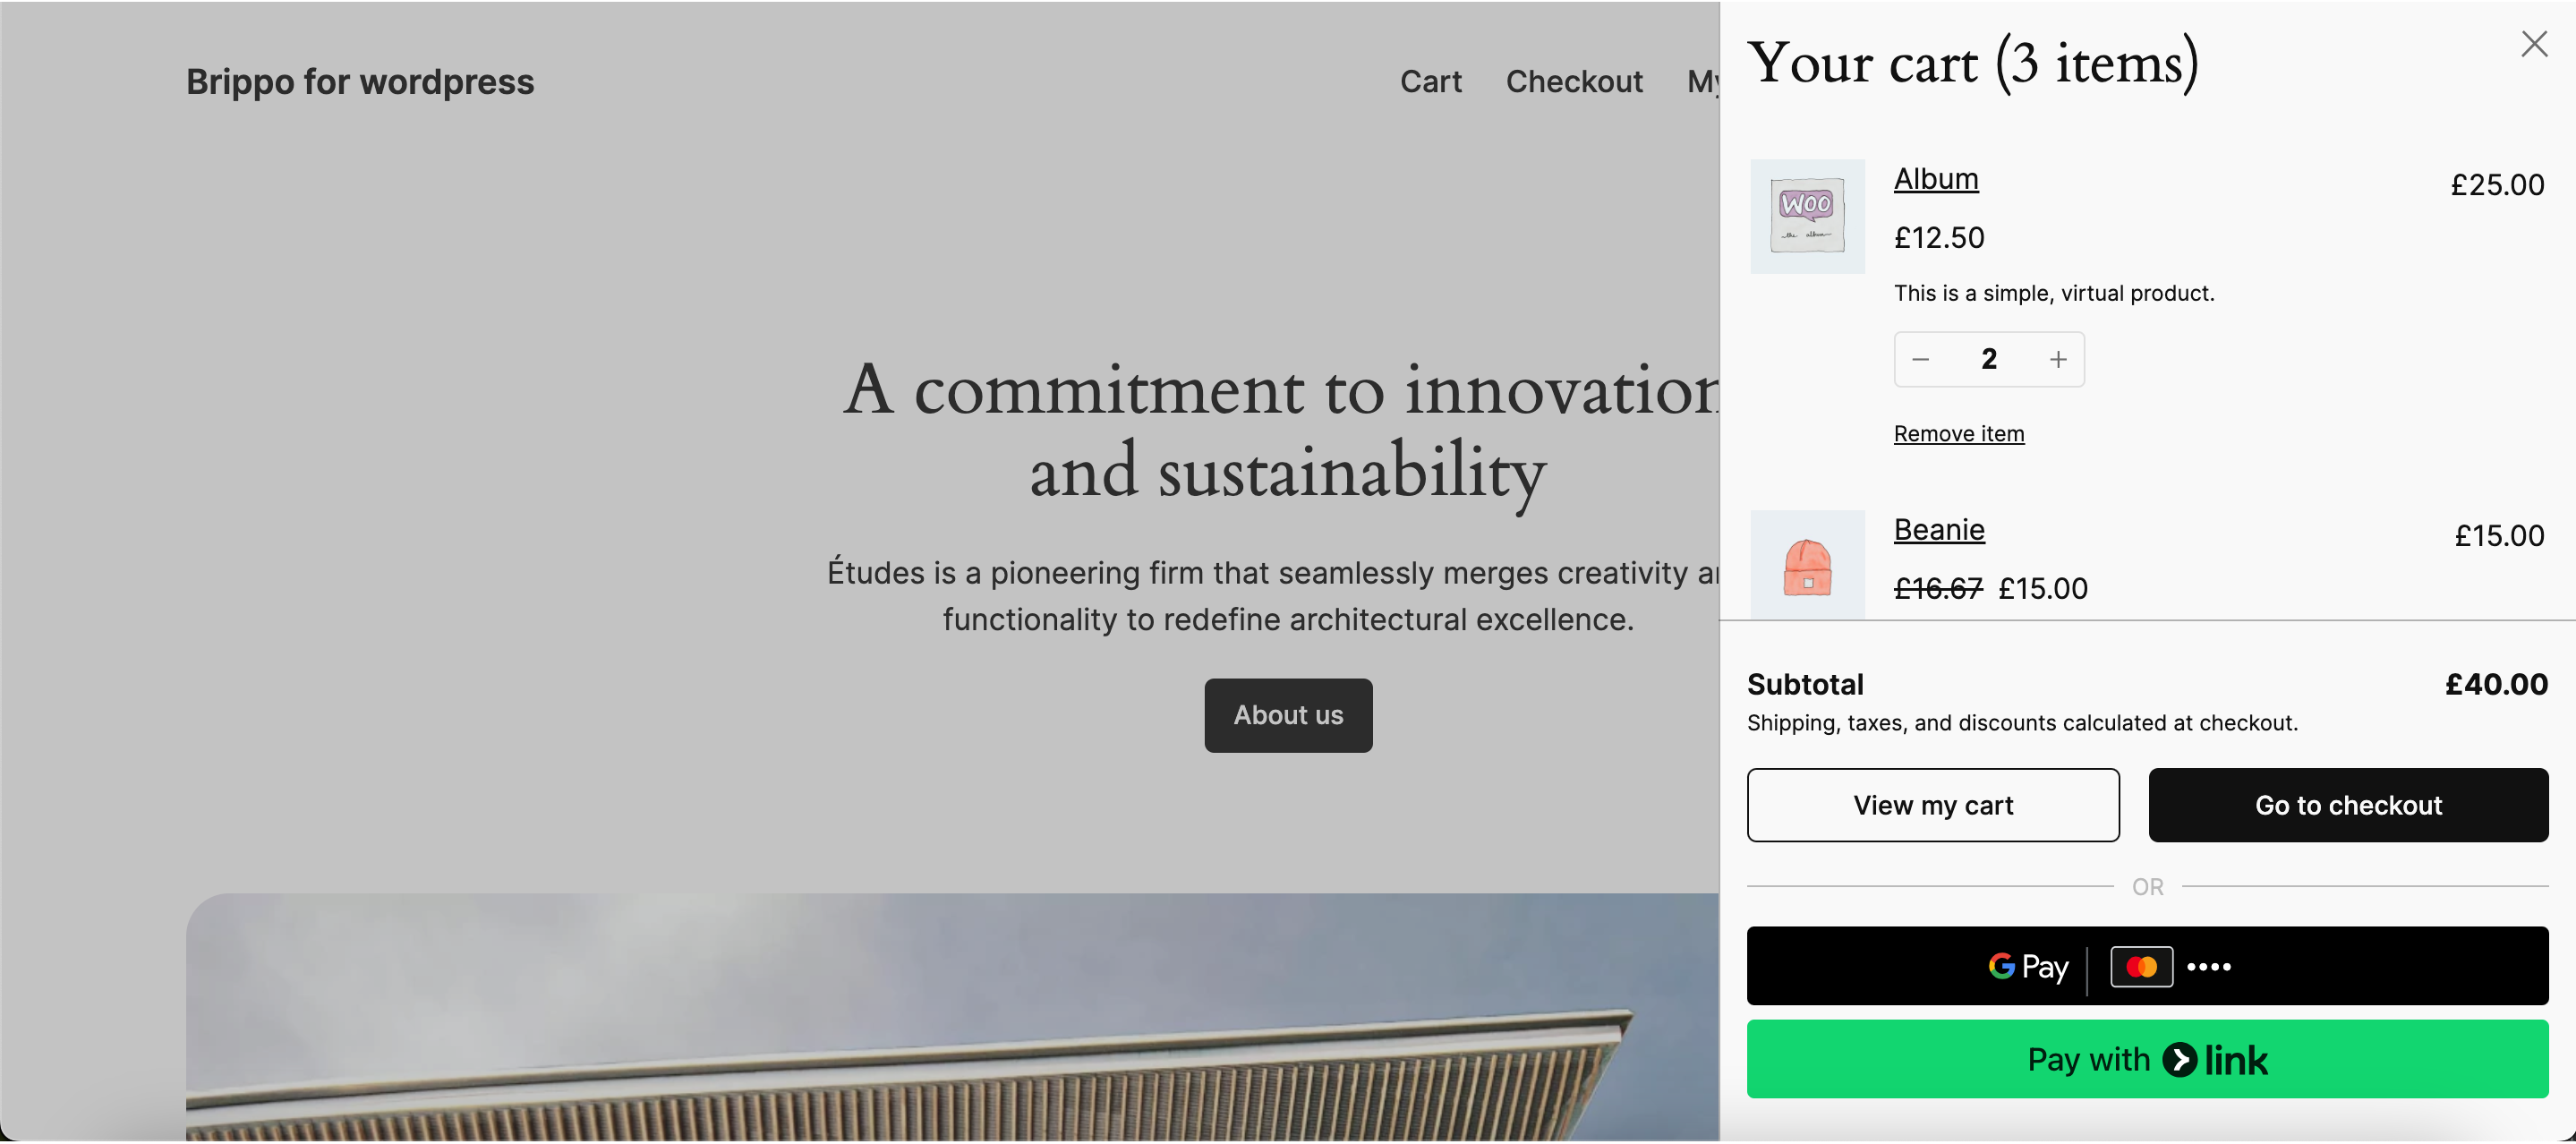
Getting Started
Adobe/Magento Installation
To install Brippo Payments in Adobe Commerce(Magento) 2.3/2.4 via Composer you can follow the guide below:
1Configure repository credentials.
- composer config repositories.ebizmarts composer https://packages.ebizmarts.com
- composer config http-basic.brippo.gitlab.ebizmarts.com brippo VBZL3yALPqrWHcf7UAB7
2*OptionalIf your store integrates eBizmarts POS solution, install the following additional extension depending on your Adobe/Magento edition.
- composer config http-basic.pos.gitlab.ebizmarts.com apiuser zPMZ7EY6cyJDHTgshzSK
- composer require ebizmarts/pos-meta "~102"
- composer require ebizmarts/pos-brippo
3*OptionalIf your store integrates eBizmarts POS solution AND supports MSI module:
- composer require ebizmarts/pos-multi-source-inventory
Configure your locations:
- Go to the Magento admin panel.
- Add your locations and warehouses where you'll manage inventory.
Associate products with sources:
- Edit the productsand associate them with the inventory sources.
Verify the setup in POS:
- Ensure your POS system recognizes the changes and correctly displays inventory across multiple locations.
The Devices tab in the POS system allows you to manage and configure devices, assign stores, update keys, and set up payment methods. For more detailed information, check out the full guide here.
4Install Brippo Payments packages.
- composer require ebizmarts/brippo-payments
5Finally, run magento deployment commands.
- bin/magento setup:upgrade
- bin/magento setup:di:compile
- bin/magento setup:static-content:deploy
Adobe/Magento Setup
Brippo configuration and setup should only take 5 minutes. After you follow these steps you'll be ready to start taking payments.
1Create a connected account. Go to your Brippo configuration, open the General section and, after selecting the Mode you wish to create the account for, click on the Setup Connected Account button. You'll be redirected to the onboarding wizard.
2Complete your business information in the onboarding wizard.
Make sure to read our Terms of Service before proceeding.
3Enable the desired integrations and payment methods from your store's Brippo configuration.
If you are not getting the desired outcome in your frontend, please refer to our known issues section or our get support section.Getting Started
WooCommerce Installation
To install Brippo Payments in WooCommerce you will need the files for a Manual Installation.
You can contact us by going to the get support section for further information on how to get the files or in case you need installation assistance.
Installation process
After getting the files, you will need to open the Wordpress admin page, and go to the Plugins section in the lower left corner of the admin page.
Afterwards, select Add New Plugin next to the 'Plugins' title, press the Upload Plugin button next to the 'Add Plugins' title, choose the Brippo Payments for WooCommerce file and press Install Now.
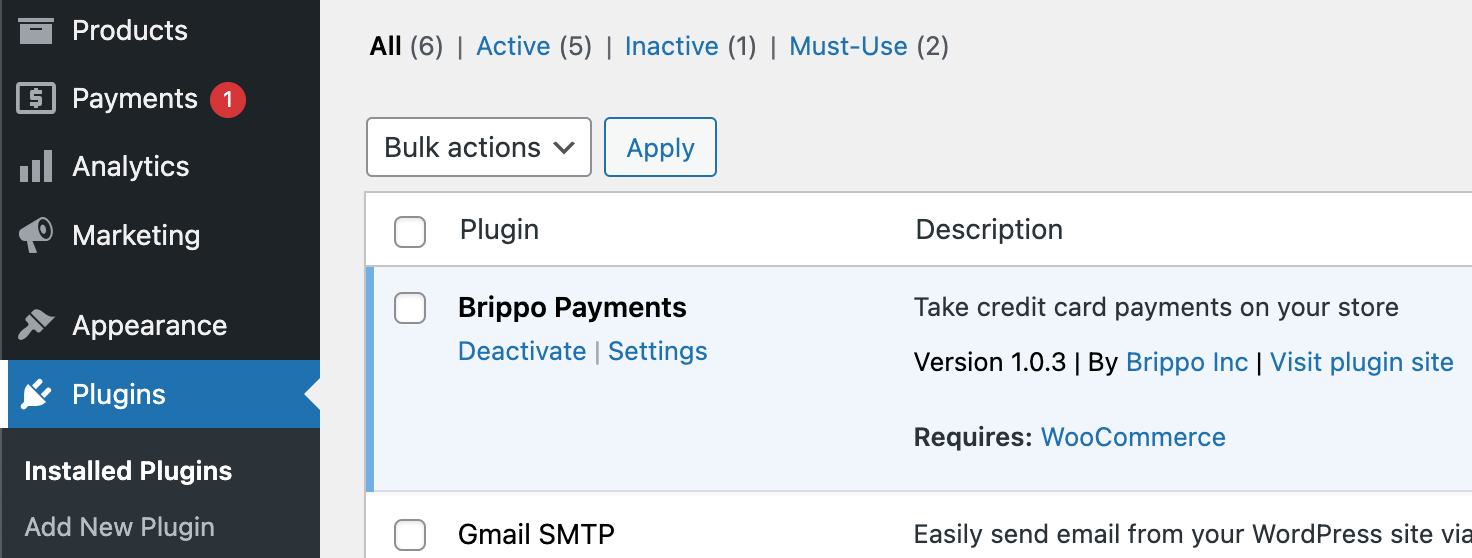
If correctly installed you should see the Plugin in the Plugins > Installed Plugins section of the Wordpress admin page as it appears below.
WooCommerce Setup
Brippo configuration and setup should only take 5 minutes. After you follow these steps you'll be ready to start taking payments.
1Activate the Brippo Payments plugin
After installing the plugin by following the previous guide, if not automatically activated, you will need to manually Activate it by pressing the Activate button found next to the Brippo Payments extension name, in the Plugins section.
Afterwards you can press the Settings button in the same section, or you can go to WooCommerce > Settings > Payments to find the Brippo Payments extension settings.
2Create a connected account
You can create a connected account by registering in the Brippo Dashboard. You can get there by pressing the Dashboard button found in the upper-right corner of this website.
Afterwards, you will need to register an account using the Register button or you can also Sign in with Google.
3Complete your business information in the onboarding wizard
After registering you will see the main page of the Brippo Dashboard where you can select either Create TEST Account or Create LIVE Account.
Select the preferred option and follow the onboarding wizard process to generate a Brippo account.
Please note that in TEST mode most values can be skipped.
4Set your Account Id in your Brippo Payments settings
When the onboarding process is over an account id will be generated, you will need to copy this account id and paste it in the Account Id field under the General section of your Brippo Payments settings.
Remember to Enable Test Mode if you have generated a Test Account id.
5Enable Brippo Payments
To start using Brippo Payments press the Enable Brippo Payments button and select the Brippo payment methods and wallets you wish to use in your store.
If you are not getting the desired outcome in your frontend, please refer to our known issues section or our get support section.Getting Started
Dashboard
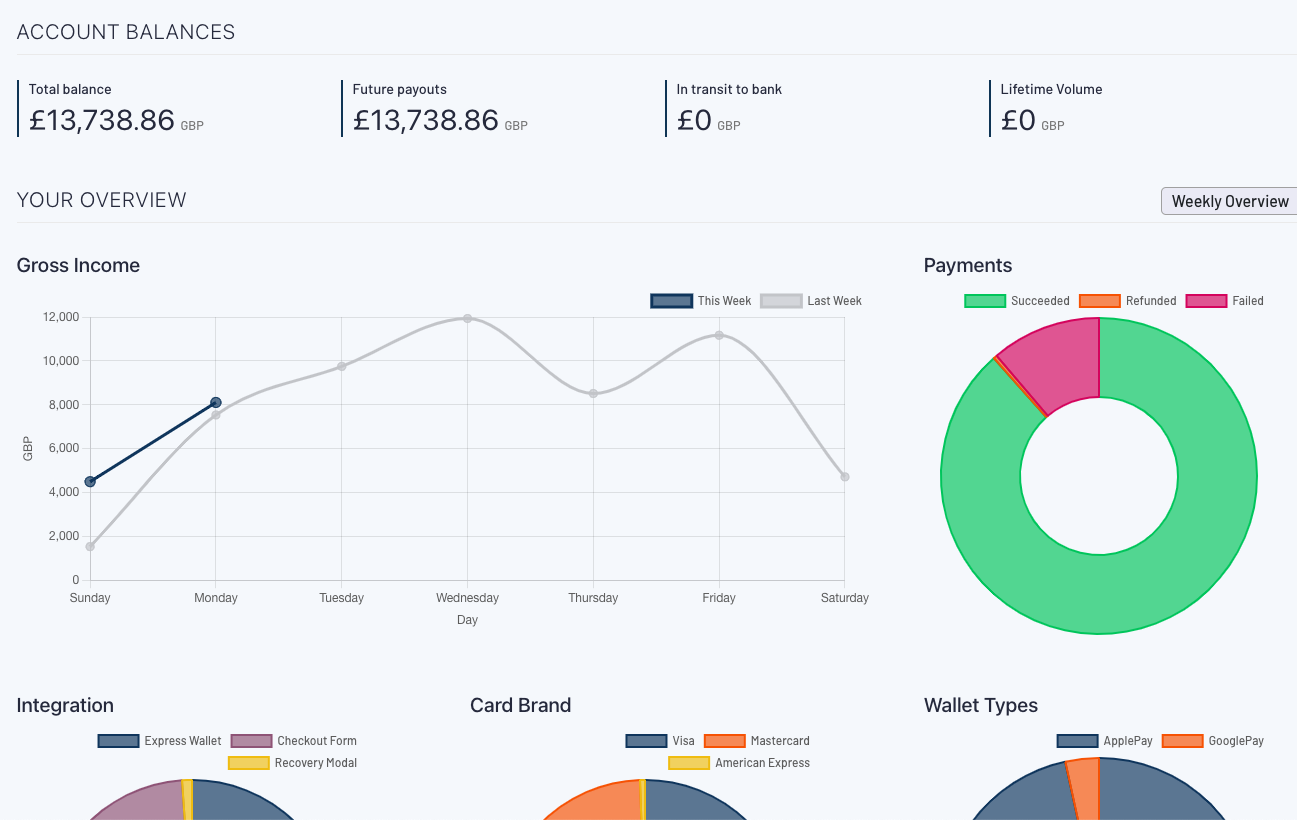
Explore the Brippo Dashboard, our user-friendly payment gateway portal that offers:
- Real-Time Transaction Monitoring, stay updated with instant transaction tracking.
- Insightful Analytics, Gain valuable insights through detailed payment reports.
- Custom User Permissions, Manage access with adjustable user controls.
- Easy Integration, Seamlessly connect with your existing systems via our API.
Accessing The Brippo Dashboard
1Go to your Brippo configuration, open the General section and click on the Dashboard button. You will be redirected to our portal.
2You will need to register a new account specifically for Brippo Dashboard access.
3[Optional] If you don't see your connected account's overview or you just want to add another test/live account, you'll need to manually link it using the account ID provided in your General section at Brippo configuration
Pay By Link
Configuration
1Enable the Payment Method
- Click Configure next to the Brippo Payments module.

2Configure Manual Customizations
- Payment Method Name: Enter the name for the payment method in the "Payment Method Title" field.
- Capture Method: Choose between:
- Manual: Authorizes the payment without capturing it immediately.
- Automatic: Authorizes and captures the payment at the same time.
- Email Customizations:
- Email Template: Select or customize the email template for customer communications.
- Email Subject: Define the subject of the email.
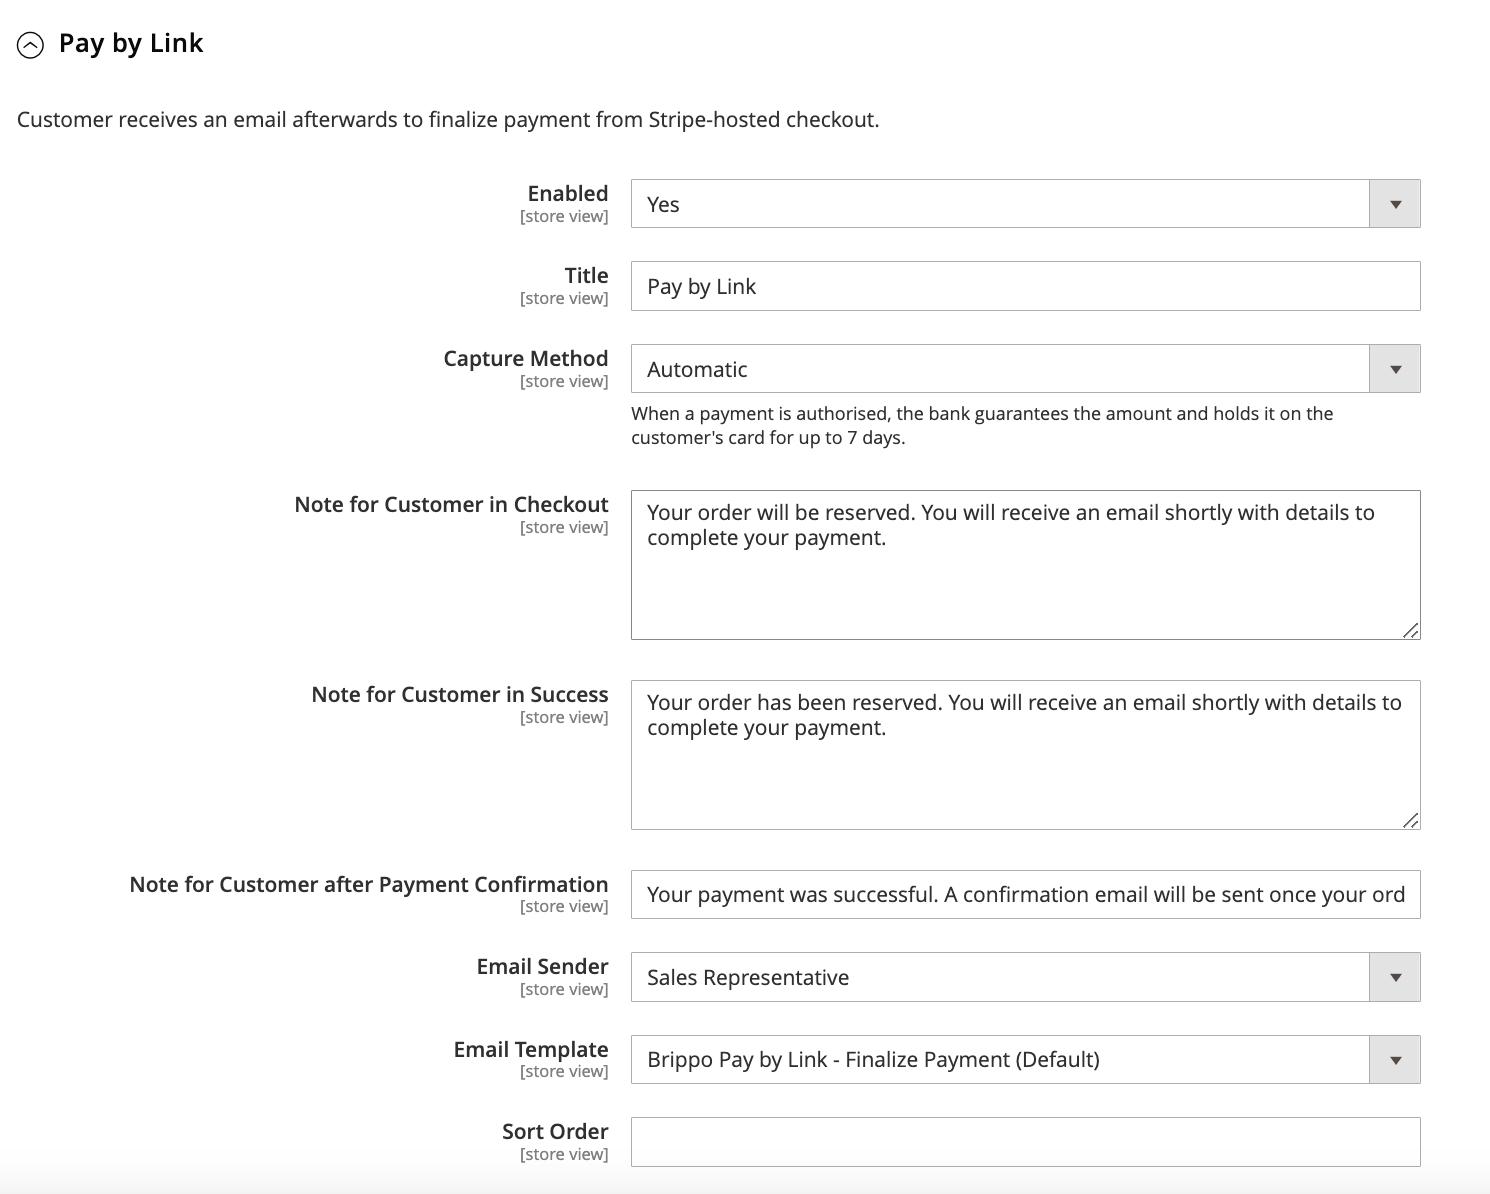
3(Optional) Backend Configuration of "Pay by Link" Method
- Enable: Check the Enable box to activate the payment method.
- Add a Title: Enter a descriptive title for the payment method.
- Select Capture Method: Choose the appropriate capture method (similar to the standard method).
- Payment Confirmation Note: Add or modify the confirmation message that will be shown after the payment.
4Save Customizations
- After configuring the options, click Save Config to save the changes.
Guide to Creating Email Templates in Magento
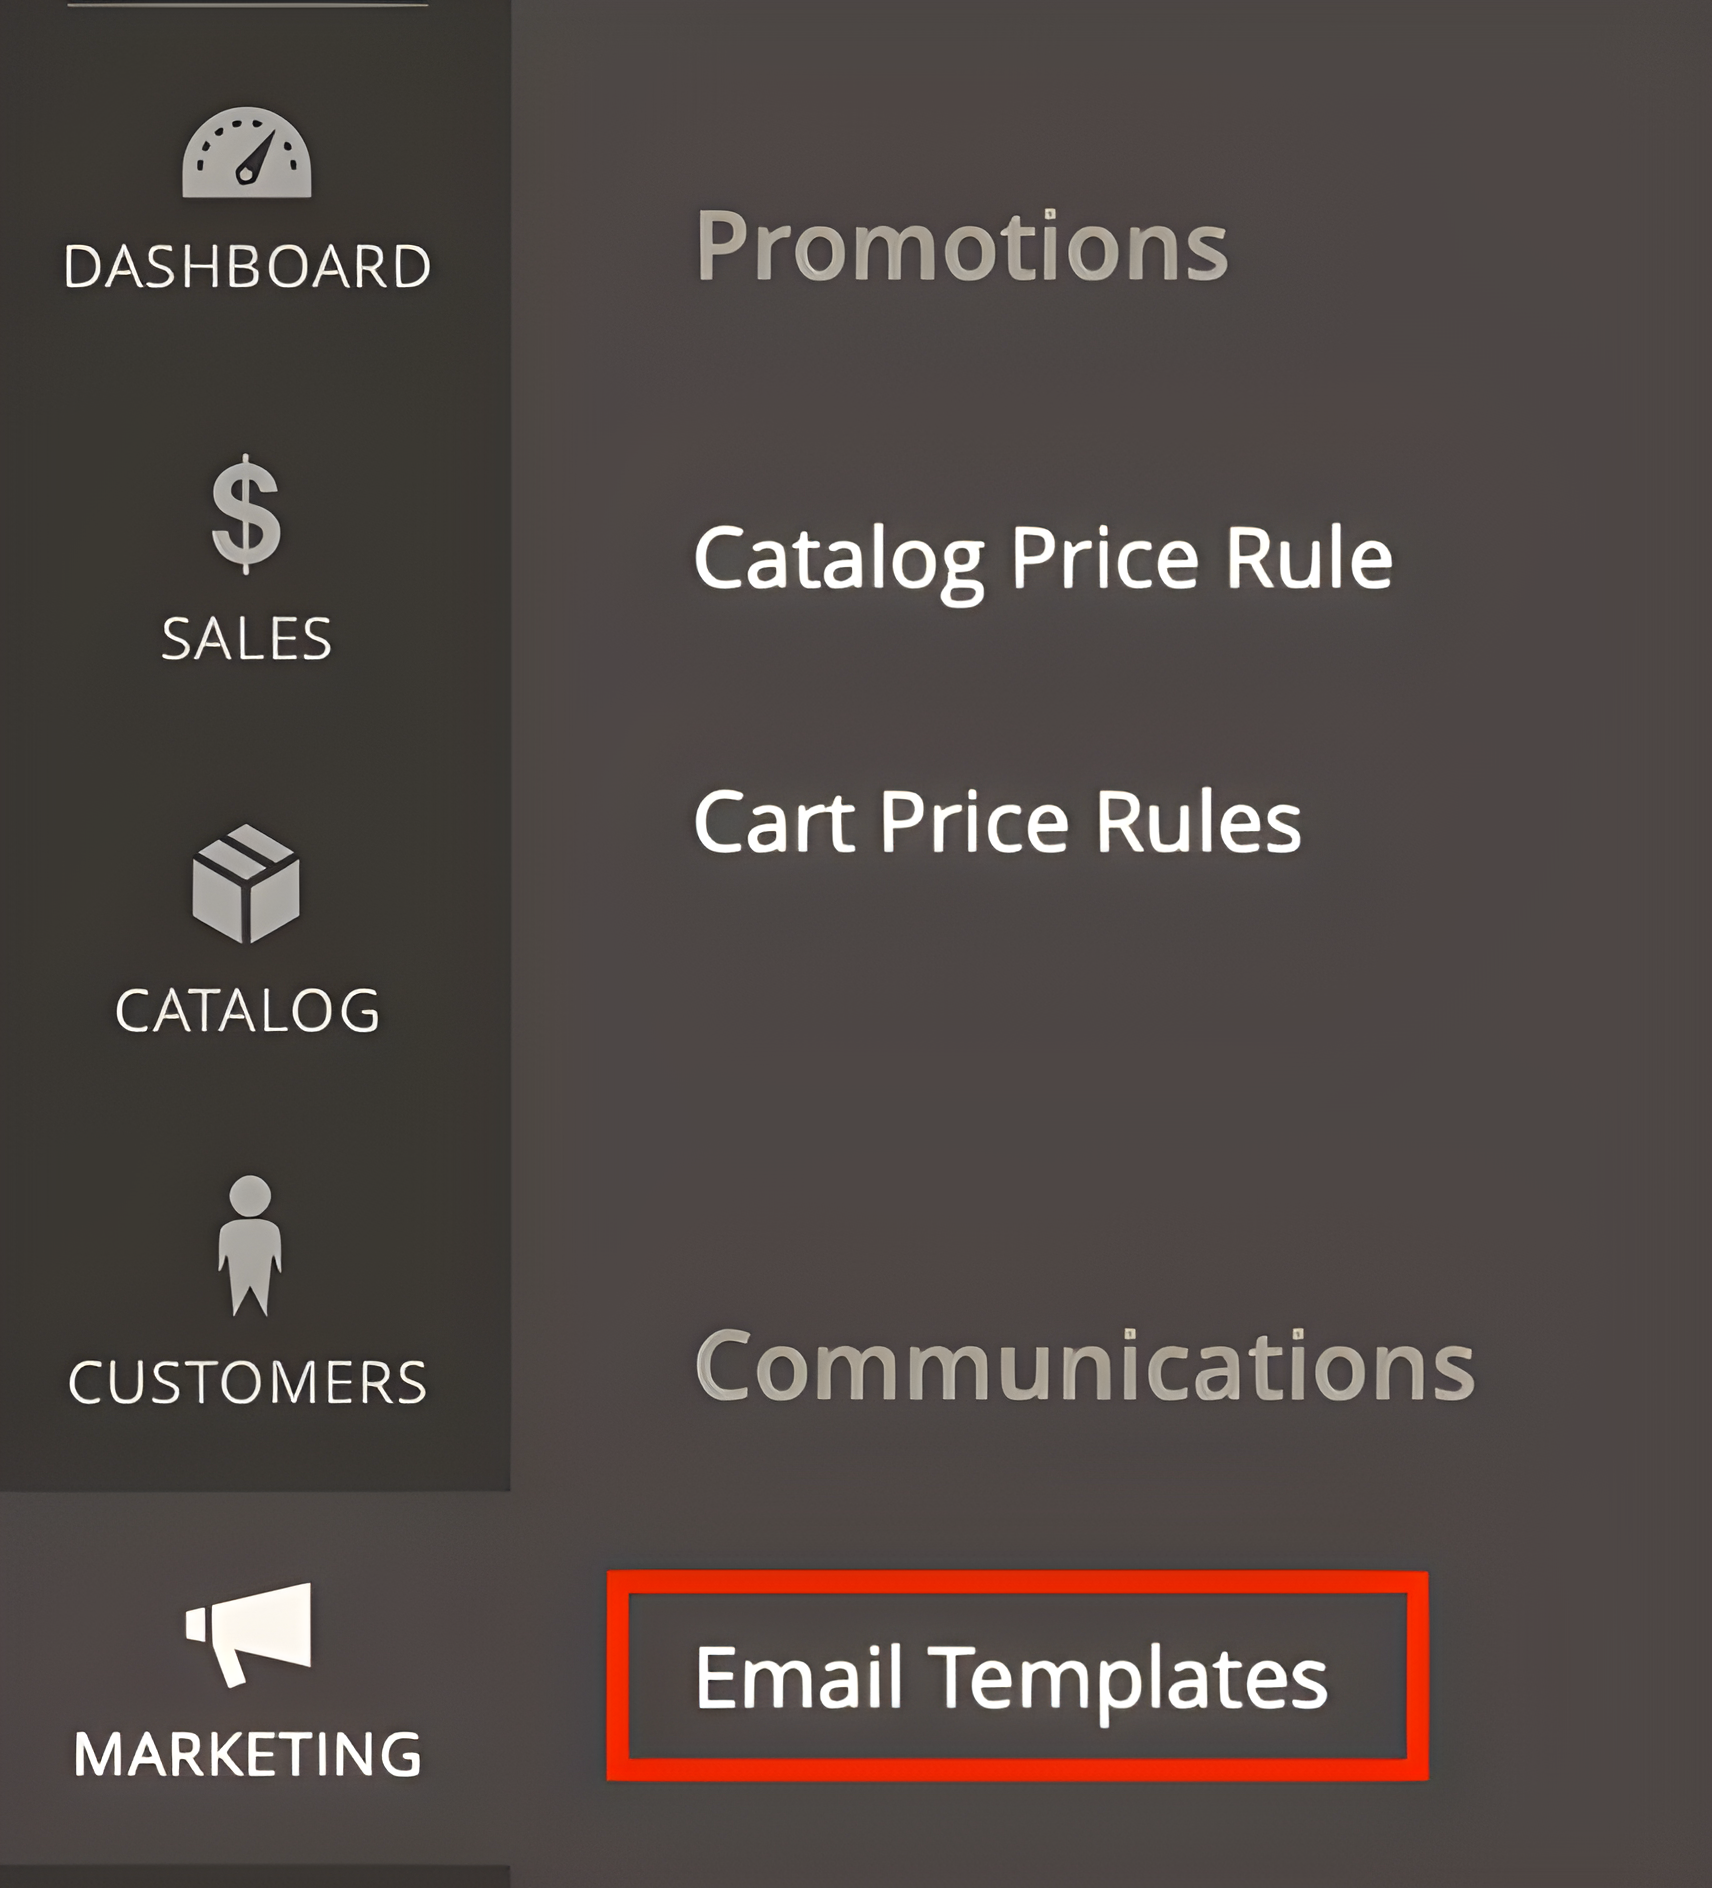
1Create a New Email Template
- Select Email Templates from the dropdown menu.
2Select a Base Template
- In the Template field, choose an existing template from the dropdown if you want to start with a pre-designed template.
3Specify Template Information
- Template Name: Enter a unique name to identify the template.
- Template Subject: Write the subject line of the email.
- Template Content: Input the email content in the editor. Use the formatting options and dynamic variables as needed.
4Save the Template
- Once you’ve filled in all the necessary fields, click Save Template to save your new template.
5Modify an Existing Email Template
- Find the template you want to edit in the list of templates.
- Click Select next to the template name and choose Edit .
- Make any necessary changes and click Save Template to update it.
6Assign the Email Template to a Transaction
- Navigate to Stores / Configuration .
- Expand the Sales section and select Payment Methods.
- Find the Brippo configuration in the list of payment methods and select PayByLink.
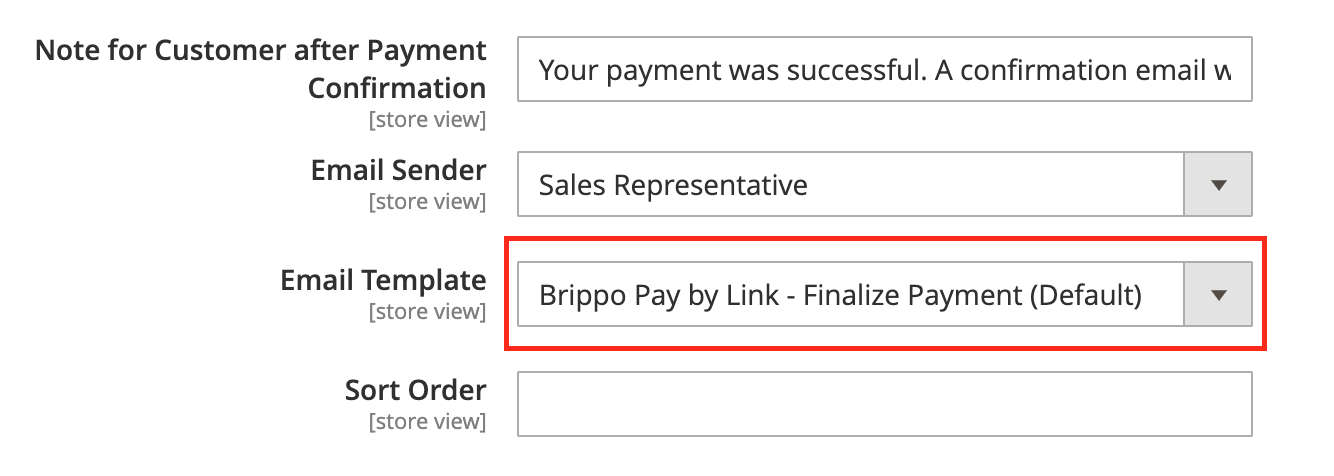
- Within the Brippo configuration for PayByLink, go to the Email Template section.
- For each email type (e.g., New Order , Invoice), select your newly created template from the dropdown menu.
7Click Save Config to apply the changes.
- Always test the email template to ensure correct formatting and content in the final email.
- You can use dynamic variables and custom content blocks to personalize your emails based on store needs.
Important Note: The template selected in the payment method configuration will be used both for the payment process on the frontend and for its display in the Magento backend. Make sure to choose a template that works well in both areas to ensure a consistent experience.
User guide for Brippo Portal
1Create a Payment Link
- Go to the Payments section within the dashboard.
- Click on the Payment Link button situated in the top-right corner of the dashboard.
2Add Required Data and Customize the Link
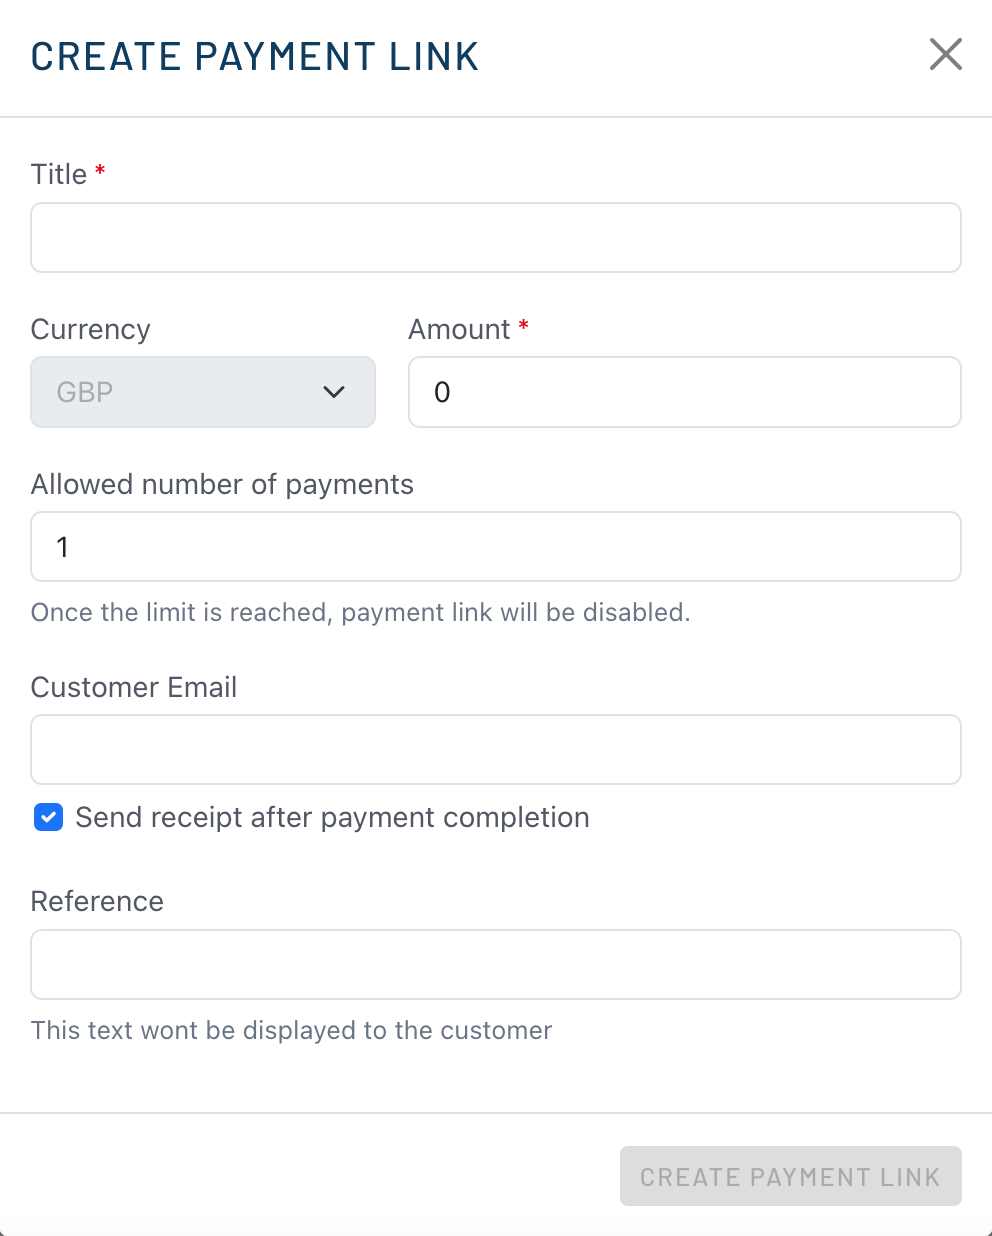
- Add Title: Enter a descriptive title to identify the payment link.
- Add Amount: Specify the amount you wish to charge.
- Add Number of Payments: Define the number of payments if it is a split payment.
- Add Customer Email: Enter the customer's email address where the link will be sent.
- Add a Reference: Enter an internal reference for your control. This reference will not be visible to the customer.
3Create the Payment Link
- Click on the Create Payment Link button. This button will also display the amount to be charged.
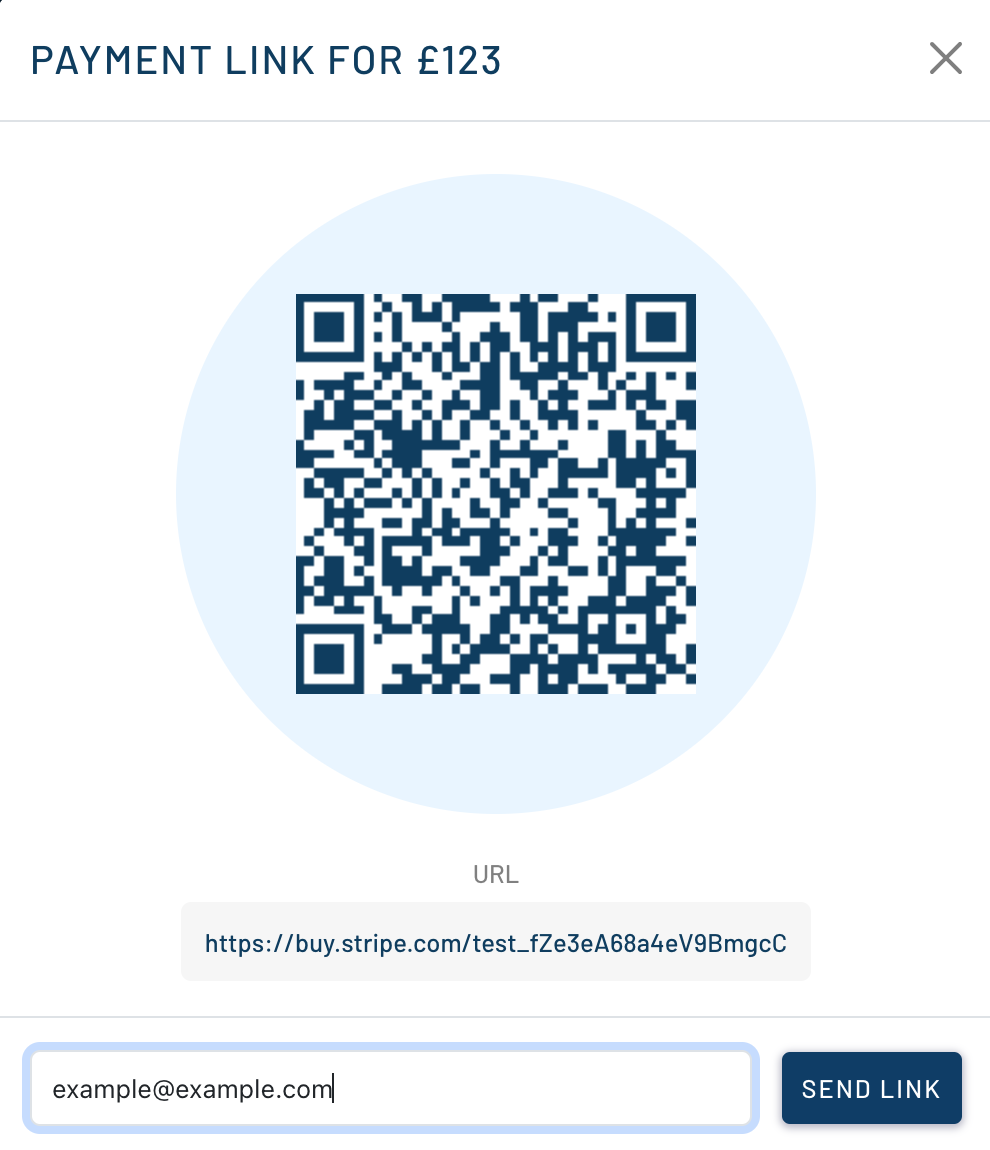
4Send the Payment Link
- Once the link is created, a pop-up will appear with a QR code that redirects the customer to the payment, along with the corresponding link.
- Verify that the customer's email is correct and click on the Send Link button to send the payment link to the customer.
User guide for Magento Backend
1Create a New Order
- Click on the Create New Order button in the top-right corner.
2Select the Customer
- On the order creation page, choose an existing customer or create a new one.
3Add Products to the Order
- In the Items section, add the products you want to include in the order.
- You can search for and add products from the Magento catalog.
4Configure Shipping and Billing Information
- Fill in the shipping and billing information for the order.
- Ensure you enter the correct address and other necessary details.
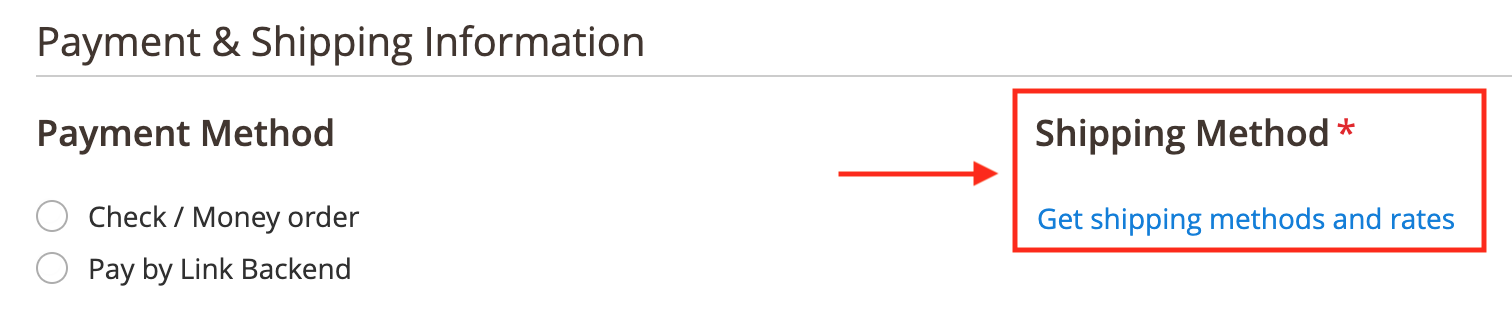
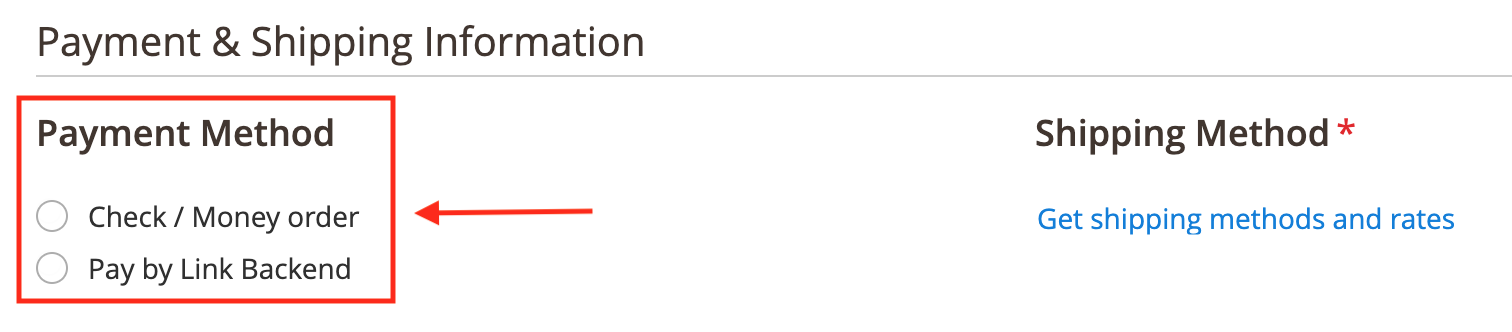
5Select the Payment Method
- In the Payment Method section, choose Pay by Link from the list of available payment methods.
- If you do not see the Pay by Link payment method, ensure that it is enabled in Magento’s configuration (see above for instructions on how to enable it).
6Review and Confirm the Order
- Review all the order information to ensure it is correct.
- Click Submit Order to complete the order creation process.
Paypal
Requirements
PayPal integration requires at least Magento Brippo Frontend version 100.1.53.
Setup
1Go to your PayPal's developer portal at developer.paypal.com.
2In the Apps & Credentials tab, create a new Platform App.
3Go to your Brippo Portal's Integrations tab.
4Look for the PayPal section, click on Connect and use the credentials you created at step 2.
Xero
Connecting Brippo with Xero
To begin the integration between Brippo and Xero, go to the Integrations section within the Brippo Dashboard. There you'll find the Xero option, and to the right, a Connect button. Clicking this button will prompt you to log in with your Xero credentials. Once entered, the connection will be successfully established, and new options will become available in the Brippo Dashboard.
Setting up a Bank Account in Xero
Once Brippo is connected to Xero, it’s essential that your Xero account has at least one bank account added. This is necessary to properly integrate the transactions.
There are two possibilities:
Bank account with Bank Feed support
You’ll be able to select a bank account from the list of supported banks based on your country.
This option enables the automatic synchronization of transactions, making it easier to import orders from Brippo to Xero without manual intervention.
Bank account without Bank Feed support
In this case, transactions must be imported manually by uploading a CSV file with the transaction data.
Although this option works, it requires more manual input and does not take full advantage of Xero’s automation features.
Note:
Once the account is connected, if the bank account appears as “undefined” after refreshing the Brippo page, you can assign it a code to easily identify it. To do so, go to Chart of Accounts, under Accounting in Xero. Locate the account, click on its name, and you’ll find the option to enter a custom code.
Manual Transaction Sync from Brippo to Xero
In the Brippo Dashboard, under the configuration section, make sure to enable the "Monthly Transactions Sync Automation" option if you want transactions to be automatically synced on a monthly basis. However, the "Upload Transactions Manually" option is available regardless of whether automation is enabled or not, allowing you to manually export orders from Brippo to Xero.
Reconciling Exported Orders with Bank Transactions in Xero
If the bank account configured in Xero does not support Bank Feed, you will need to import the transactions manually. To do so, follow these steps in Xero:
1Select the configured bank account.
2Go to the Manage Account menu.
3Choose the Import a Statement option.
From there, Xero will allow you to download a CSV template, which must be manually filled with the transaction data obtained from Brippo’s Payouts section. Each transaction must include the following fields properly filled out:
- Date
- Amount
- Payee
- Description
- Reference
Once the transactions are imported via the CSV file, you’ll need to reconcile them with the corresponding orders from Brippo. To do this, return to the Xero dashboard, where a notice will appear indicating the number of transactions pending reconciliation. Clicking on this notice will take you directly to the transaction list.
If the CSV data was correctly uploaded, the transactions will appear in green, indicating an automatic match. In this case, simply click OK to confirm the reconciliation.
If a transaction doesn’t match automatically, you will need to manually assign it from the list of unreconciled transactions, ensuring the amount, date, and reference match the orders exported from Brippo.
Hyvä
Hyvä Compatibility Module Installation Guide for Brippo Payments
This module is required to integrate Hyvä Themes with Brippo Payments Frontend in your Magento store. Below are the steps to install the module correctly.
Prerequisites
- Magento 2.x installed and configured.
- Composer installed in your environment.
- Hyvä Theme correctly installed in your Magento.
- Access to the terminal with proper permissions on the server.
Installation Steps
Enable Maintenance Mode
To prevent users from accessing the store during the installation process, it is recommended to enable maintenance mode
- bin/magento maintenance:enable
1Install the Hyvä Themes compatibility module
- composer require hyva-themes/magento2-ebizmarts-brippo-payments-frontend:">=1.0.6"
2*OptionalInstall Hyvä Checkout compatibility module
- composer require hyva-themes/magento2-hyva-checkout-ebizmarts-brippo-payments:">=1.0.6"
3Run the Upgrade and Compilation Process
Update Magento, compile the dependencies, and generate static content:
- bin/magento setup:upgrade
- bin/magento setup:di:compile
4Deploy Static Content
Deploy static content in the production environment. Make sure to force it so that all the necessary files are generated:
- bin/magento setup:static-content:deploy -f
5Clear Cache
Once static content is deployed, flush Magento's cache to ensure all changes are applied correctly:
- bin/magento cache:flush
6Disable Maintenance Mode
After completing the installation, disable maintenance mode to allow users to access your store again
- bin/magento maintenance:disable
Installation Verification
- Visit the frontend of your store and verify that the integration with Brippo Payments is working correctly with the Hyvä Theme.
- If you encounter any issues, check the logs in var/log to identify and resolve potential errors.
Guide for Configuring the Brippo Payment Method in Hyvä
This guide explains how to configure and use the Brippo payment method for Hyvä stores.
1Integrate Your Brippo Account
First, ensure that you integrate Brippo with your Hyvä store. To do this, set up a Brippo account and link your banking details. If you already have a Brippo account, connect it to Hyvä and obtain the necessary credentials for integration.
2Enable the Payment Method
Once the account is integrated, go to the payment configuration section in the store and enable the payment method. Change the activation option to "Yes" to make the method available in your store's checkout process.
3Configure the Title
Set the title that will appear to customers when selecting this payment method. By default, it displays as "credit or debit card," but you can customize it to reflect the type of payment you offer.
4Choose the Payment Capture Method
Configure how you want to capture the payment:
- Automatic: captures payment when the order is completed.
- Manual: allows you to capture the payment manually after the order.
- By status change: captures based on the order status, such as "pending" or "closed."
This option is crucial for defining when and how the payment will be processed.
5Enable 3D Security
To add an extra layer of security, enable the 3D authentication option. This requires additional verification from the cardholder, helping reduce fraud and ensuring safer transactions.
6Integrate Digital Wallets
You can add options like Apple Pay or Google Pay to the payment process. This gives your customers more payment options, potentially enhancing their checkout experience.
7Set Display Order
Customize the display order of Brippo in the list of payment methods. This allows you to control its position during checkout, making it easier for customers to find.
8Style Customization
Adjust the visual style of the payment method to align with your store’s design. You can personalize it to blend seamlessly with the overall appearance of your website.
Guide to Configuring Alternative Payment Types
This guide covers the steps to activate and customize the alternative payment types feature, enabling the use of virtual wallets for payments.
1Enable the Payment Method
Start by enabling the alternative payment types method. Set the activation option to "Yes" to make it available in your store. Once activated, additional configuration and customization options will appear.
2Customize Payment Method Details
In the configuration settings, you can personalize various details:
- Title: Set a custom title for the payment method as it will appear to customers.
- Capture Method: Choose how payments will be captured (e.g., automatic or manual).
- Business Name and Currency Options: Display options for your business name and selected currency.
- Payment Method Locations: Select where this payment method will be available, such as on the product page, cart, minicart, and checkout
3Add Agreements and Select Virtual Wallets
You can add terms of agreement for the payment method if needed. Additionally, select which virtual wallets will be available for customers, offering them flexible payment options.
4Customize Styling and Display Options
Adjust the visual appearance of the payment method to fit your store’s design. You can:
- Toggle Button Display: Choose to display the payment button both in a list view with other payment methods or as a standalone button at the top of the list.
This configuration will enhance your customers' payment experience by offering a convenient and visually integrated option for using virtual wallets in your store.
Guide to Using Credit and Debit Card Payment Method in Checkout
This guide will walk you through using the credit and debit card payment method from a user's perspective during the checkout process.
1Add Product to Cart
Start by adding a product to your cart. Once the item is in your cart, proceed to the checkout page.
2Login (Optional)
If you are logged into a test account, you won’t need to manually enter your address details, as they will be saved automatically. This step is optional, but it speeds up the checkout process.
3Payment Section
Once you reach the payment section, you will find the credit or debit card payment method available.
4Enter Card Details
Enter your test card details into the provided fields. The system will process the payment, and you should see a confirmation that the transaction was completed successfully.
This simple process allows customers to use their credit or debit card to make purchases quickly and securely.
Guide to Using Alternative Payment Types
This guide will show you how to use the virtual wallet payment method from the user's perspective, completing a transaction at checkout.
1Add Product to Cart
If the virtual wallet payment method has been enabled in the settings, it will be available in the cart, product page, and mini cart. Add a product to the cart and ensure it loads correctly.
2Proceed to Checkout
Proceed to checkout, where the virtual wallet payment method should appear. In this case, the display option is set to show at the top of other payment methods.
3Select the Payment Method
Select the payment method, and you’ll see your virtual wallet cards available to complete the transaction. In this example, test cards are being used.
4Complete the Transaction
Complete the payment process. Address and shipping information will be provided, and you’ll be able to confirm that the transaction processes successfully.
With this, the virtual wallet payment is completed, offering a quick and secure shopping experience for the customer.
Guide to Using Payment Methods with Hyvä Checkout Themes
This guide demonstrates how payment methods operate with the available Hyvä checkout themes.
1Activate Hyvä Default Theme
With the Hyvä default theme activated, add a product to the cart to create an order and proceed to checkout. The payment methods should display correctly.
2Switch to One-Page Checkout
Return to the Hyvä theme settings and switch to the one-page checkout option. Refresh the store page, proceed to checkout, and confirm that the payment methods display correctly and are fully functional.
This process ensures that payment methods integrate smoothly across different Hyvä checkout layouts
Disputes
General Disputes
How to Manage Disputes in Brippo
When a customer disputes a charge, it means they have questioned a transaction made with their card. This dispute process can be complex, and Stripe will hold the involved funds until it is resolved. Here’s a guide on how to effectively handle such situations.
1Understand the Nature of Disputes
Disputes arise when a customer does not recognize or questions a purchase. Stripe acts as an intermediary, temporarily holding funds until the situation is investigated. Before taking any action, it’s essential to thoroughly understand the transaction details and the reason for the dispute.
2Review the Details of the Dispute
Before proceeding, verify the basic information:
- Transaction details such as the date, amount, and customer name.
- Reason for the dispute provided by Stripe; understanding the rationale behind the dispute helps determine the appropriate response.
- Possible communication with the customer; in some cases, speaking directly with the customer can resolve the conflict amicably and quickly.
3Prepare a Response
If you decide to respond to the dispute, make sure to back up your case with solid evidence. Some useful documents may include:
- Payment receipts.
- Invoices or delivery proofs.
- Records of any communication you had with the customer. It’s important that the information provided is clear and detailed, as you won’t be able to modify it after sending it to Stripe.
4Importance of Accuracy
Remember that once you submit your response, there will be no way to correct or add information. Carefully review every detail to ensure all evidence is correct and sufficient.
Conclusion:
Prevention is the best strategy. By following these recommendations, you can reduce the risk of fraudulent disputes and protect your business. For further assistance, remember that our Brippo support section is available to guide you through these processes and provide detailed advice.
Disputes
Guide to Handling Fraudulent Transaction Disputes
Fraudulent disputes are a common issue for merchants, occurring when a cardholder claims they did not authorize a payment. This could be due to a simple misunderstanding or fraudulent use of the card.
Strategies to Prevent Fraudulent Disputes:
Implementing effective strategies can significantly reduce the chances of facing fraudulent disputes. Here are some key practices to consider:
- Clear statement descriptor: Ensure that the name appearing on the bank statement is easily recognizable to your customers and matches your business name or website URL.
- Sending receipts: Send a receipt immediately after the transaction to help customers remember their purchase.
- Best practices for fraud prevention: Familiarize yourself with and implement best practices to prevent fraud, protecting your business and giving customers peace of mind.
Steps to Win a Dispute:
This selection is very important in determining who will be the winner of the dispute, so it is crucial to pay close attention to the option selected.
- The cardholder withdrew the dispute: Use this information if the customer withdrew the dispute or admitted it was a mistake.
- The cardholder was refunded: Mention and provide documentation if you have issued a refund.
- The purchase was made by the rightful cardholder: Explain that the transaction was made by the cardholder or an authorized representative.
- Other: If the transaction was authenticated with 3D Secure, include it as proof of validation.
Conclusion:
Prevention is the best strategy. By following these recommendations, you can reduce the risk of fraudulent disputes and protect your business. For further assistance, remember that our Brippo support section is available to guide you through these processes and provide detailed advice.
Disputes
Guide to Handling Disputes for Products Not Received
Disputes over products not received can arise when a customer claims that their order did not arrive. These disputes can be challenging, but taking proactive steps can help mitigate their occurrence.
Strategies to Prevent Product Not Received Disputes:
Implementing effective strategies can significantly reduce the chances of facing disputes regarding undelivered products. Here are some key practices to consider:
- Keep Shipping Records: Save shipping labels and, for high-value items, consider requiring a signature upon delivery to ensure accountability.
- Enable Customer Communication: Make it easy for customers to contact you about delivery issues. Sending a receipt upon payment that customers can reply to directly can facilitate communication.
- Track Usage for Digital Goods: For digital items or services, maintain access logs or other documentation showing usage linked to the customer, providing proof of delivery.
- Honor Policies for Refund Requests: Promptly adhere to your written policies if a customer requests a full or partial refund due to non-receipt.
Steps to Win a Dispute:
This selection is very important in determining who will be the winner of the dispute, so it is crucial to pay close attention to the option selected.
- The cardholder withdrew the dispute: Include this information if the customer retracted their claim.
- The cardholder was refunded: Provide documentation demonstrating that the refund was issued.
- The cardholder received the product or service: Show evidence that the product was delivered or the service was rendered.
- The product, service, event, or booking was cancelled or delayed due to a government order (COVID-19): Include any relevant documentation related to cancellations or delays.
- Other: Provide any additional information that may support your case.
Conclusion:
Prevention is the best strategy. By following these recommendations, you can reduce the risk of fraudulent disputes and protect your business. For further assistance, remember that our Brippo support section is available to guide you through these processes and provide detailed advice.
User Guides
Additional Charge
Generating an Additional or Extra Charge for a specific transaction is possible through the Brippo Dashboard.
If you wish to generate an additional charge you can follow the step-by-step guide below.
Step-by-Step Guide
1Go to the Brippo Dashboard using the link in the upper right corner of this website and login with your account.
2Select your website account in the upper left corner of the Dashboard and go to the Payments section.
3Click or Tap the transaction for the customer you wish to generate an Additional Charge for. This should open a pop-up with the transaction information.
4Inside the pop-up you should see an Additional Charge button, just next to the Refund button. After pressing the button a Create Charge pop-up will appear where you can select the Amount, the Currency, the Payment Method and add a Description to the Charge. After setting everything and selecting the Create Charge button the Additional Charge will automatically be created for the customer's card.
If this feature appears locked, you will need to contact us using the email found in our get support section.Video Guide
Below is a helpful visual guide on how to use the Additional Charge feature:
User Guides
Brippo Monitor User Guide: Notifications and Error Cases
The Brippo Monitor is a tool designed to help online store administrators track orders and payments processed through Brippo. This monitoring system is configured to detect potential issues in orders and automatically sends email notifications to customers when discrepancies or incidents are identified. This ensures that actions can be taken quickly to avoid any potential issues during the purchasing process.
The monitor analyzes a set of specific criteria to determine when a notification is necessary. Below are the cases in which the Brippo Monitor will send an email to the customer so they can review the order and take appropriate action.
Cases When the Brippo Monitor Sends a Notification:
- Duplicate Orders: When the system detects that the same order has been submitted more than once, either due to an error or a payment process issue, the Brippo Monitor sends a notification to the customer asking them to verify if it's a duplicate and confirm what action should be taken.
- Example: The customer makes a purchase, and for some reason, an additional order is generated with the same products. The monitor detects the duplication and sends an email to the customer indicating the issue.
- Discrepancy in the Payment Amount: If the amount of an order in the Brippo Dashboard does not match the amount recorded in Magento, the Brippo Monitor will send an email to the customer alerting them to the discrepancy. This could be caused by differences in payment processing or an error in the synchronization of data between both platforms.
- Example: The customer makes a purchase, but the final amount displayed in the Brippo Dashboard is different from the one shown in the Magento platform. The monitor sends an email for the customer to review the order.
- Payment Completed, but the Order is in Canceled Status: In cases where a payment for an order is completed successfully but the order remains in a "canceled" status, the Brippo Monitor detects this discrepancy and sends a notification to the customer so they can investigate and confirm the situation.
- Example: The customer pays for their order, but due to a synchronization or configuration error, the order appears as "canceled" instead of "completed." The monitor will send an email to the customer to review it.
- Payment Not Completed, but the Order is Not Canceled: If a payment is not successfully completed but the order is not automatically canceled in the system, the Brippo Monitor will send a notification to the customer informing them of the situation so that action can be taken to avoid problems in processing the order.
User Guides
Adobe/Magento Order Status Flow
Brippo Payments uses custom order statuses to ensure a smooth payment workflow and provide clear feedback for the order processing team.
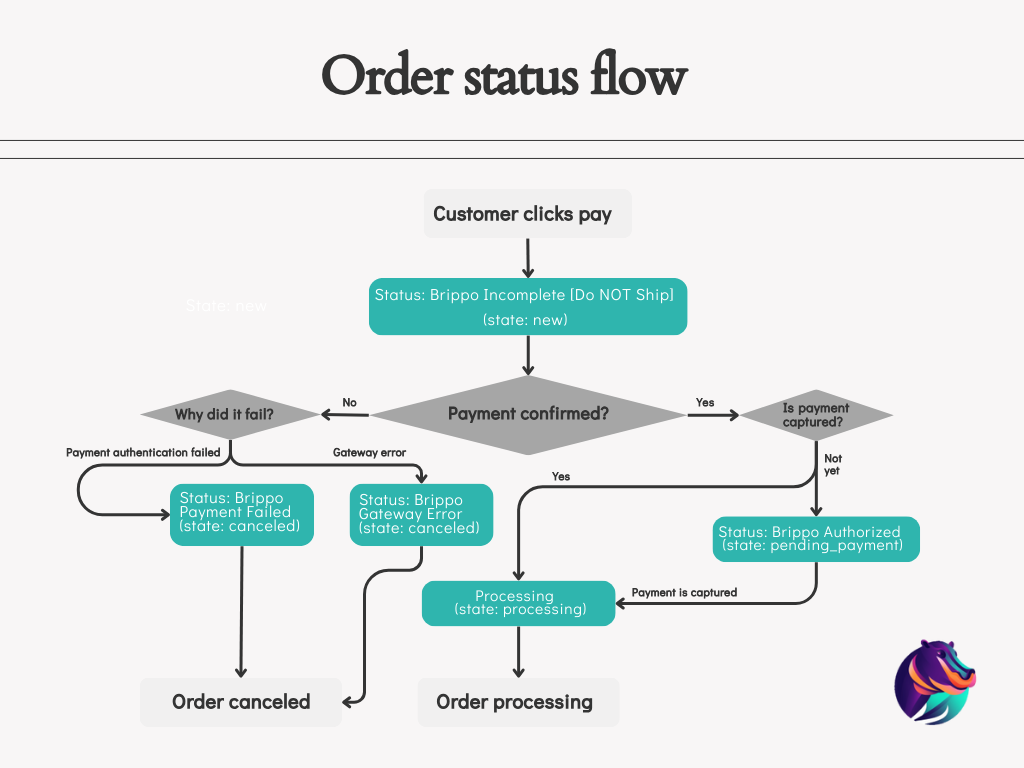
Order Status Flow Guide
Here you can find a list of our custom Order Statuses and when they appear within the order workflow:
1Brippo Incomplete [Do NOT Ship] (state: new)After the customer clicks 'Pay' and before the payment is confirmed, an order is created with this status as default.
2Brippo Payment Failed (state: canceled)The payment failed authentication, the order is canceled.
3Brippo Gateway Error (state: canceled)The processing service failed at some point, the order is canceled.
4Brippo Authorized (state: pending_payment)The payment was authorized but remains uncaptured. This status only occurs if Capture Method is not automatic.
5Processing (state: processing)The payment was captured and the order was invoiced.
Brippo Order flow diagram:
User Guides
Setup Connected Account
Brippo allows users to either connect an existing account or create a new one. Best practice suggests using one Connected Account per business entity. Below is a detailed guide on how to set up your Connected Account:
Steps to set up your Connected Account
1Access the Connected Account Setup Menu- Navigate to General -> Setup Connected Account in Magento.
- If you already have a Connected Account linked and you can link or create another, first click on the "Reset" button.
- Log in to or sign up for the Brippo dashboard.
- A menu will appear with two options:
- Create New Connected Account
- Link Existing Connected Account
- Select
Create New Connected Account. - Complete the registration process in the Brippo dashboard.
- Once the registration is complete, you'll be redirected to Magento. If the process is interrupted, you should see a 'Complete' button in Magento's Brippo configuration to resume the onboarding process.
- Select Link Existing Connected Account.
- Enter the Account ID of the existing account (e.g., acct_XXXXXXXXXXXXX).
- Confirm the connection.
- Verify the following:
- The account was successfully linked.
- The redirection back to Magento was successful.
- Place a test order to confirm everything works as expected.
- For the "Link Existing Connected Account" option, ensure the correct Account ID is used.
- If any issues arise, check the logs or contact our Brippo support
Video Guide
Below is a helpful visual guide on how to use the new feature
User Guides
Recover Checkout
The Recover Checkout feature helps you recover canceled or pending payment orders by notifying the customer with a secure payment link. Customers return to a pre-filled cart and complete their purchase in seconds.
Automatic Recovery
Brippo can automatically send recovery notifications to customers at configurable intervals. No manual intervention required.
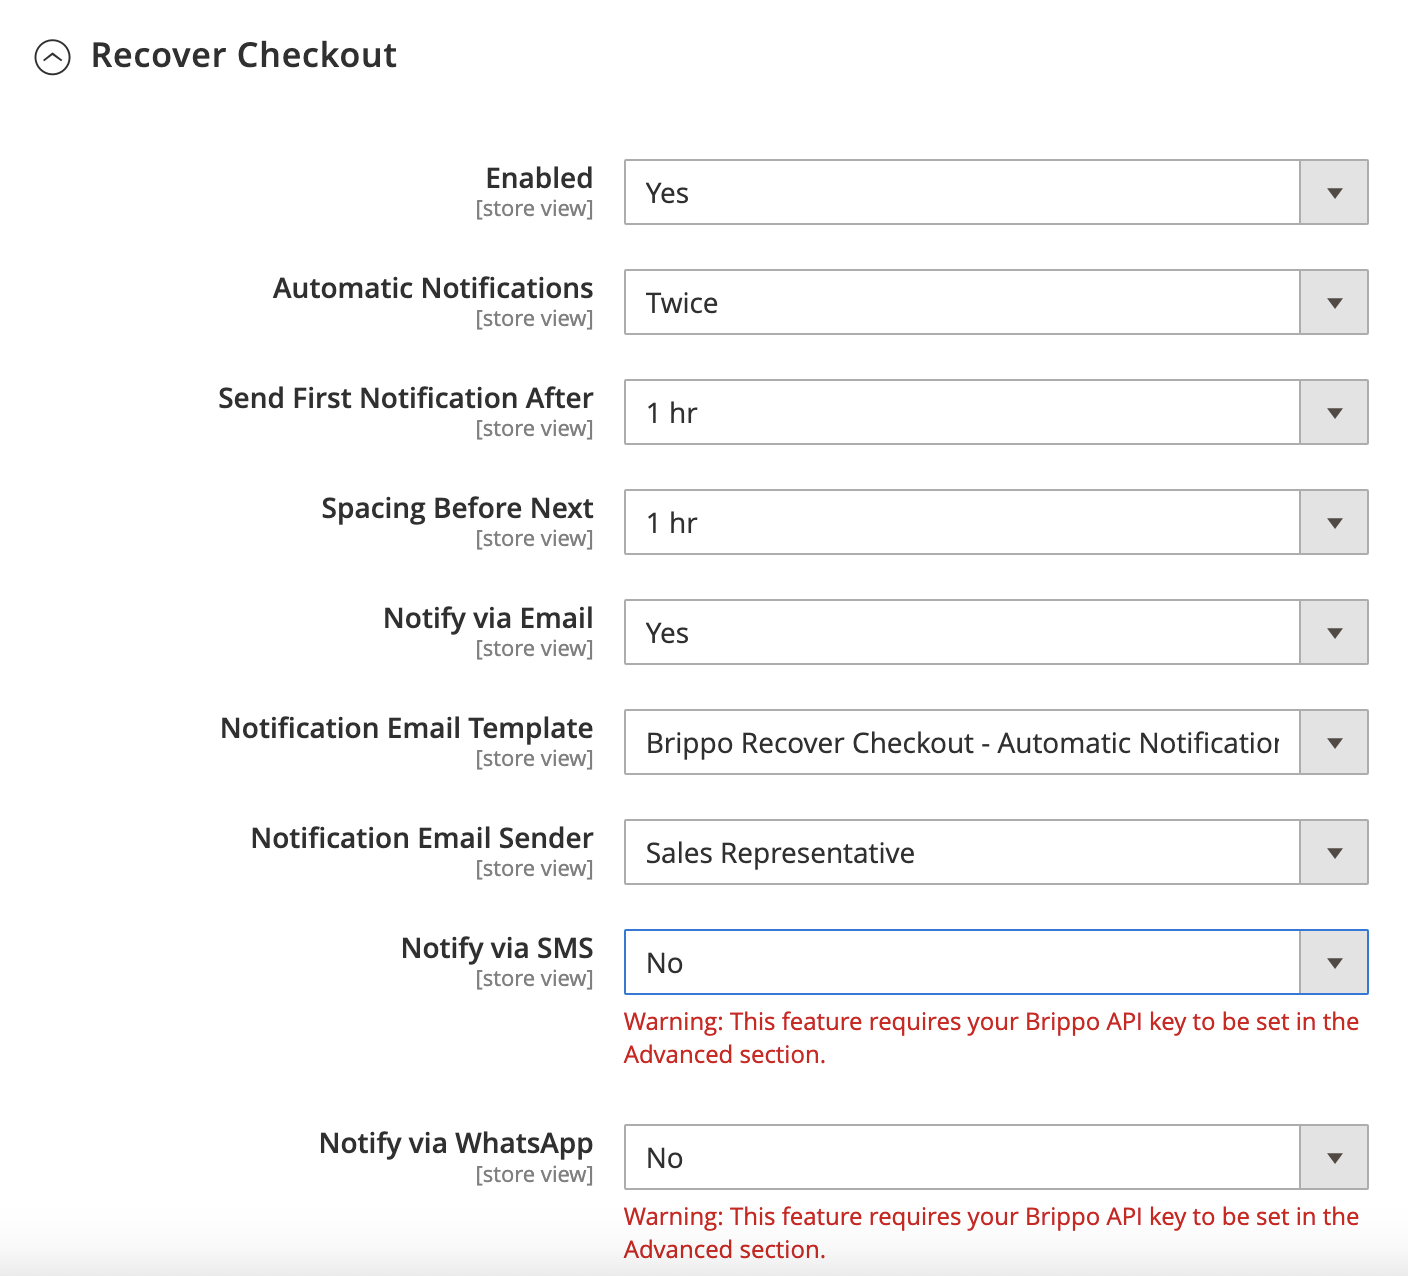
1Enable Recover Checkout- Navigate to Stores > Configuration > Sales > Payment Methods > Brippo Payments.
- Expand the Recover Checkout section and set it to Enabled.
- Automatic Notifications — How many recovery messages to send per order (1 to 5, or Disabled).
- Send First Notification After — Time after the order is canceled before the first notification is sent (1 hour to 1 week).
- Spacing Before Next — Spacing between subsequent notifications (1 hour to 1 week).
Enable one or more channels for recovery notifications:
- Notify via Email — Sends a recovery email using a configurable template and sender identity.
- Notify via SMS — Sends a text message with the recovery link (requires Brippo API key).
- Notify via WhatsApp — Sends a WhatsApp message with the recovery link (requires Brippo API key).
- Select a custom email template under Notification Email Template.
- Choose the sender identity under Notification Email Sender.
- To create or modify templates, go to Marketing > Email Templates in Magento.
Manual Recovery
Recover individual orders directly from the Magento admin order view.
1Open the Order- Navigate to the order you wish to recover.
- The order status must be Canceled or Pending Payment.
- In the Information section of the order, click the "Recover with Brippo" button.
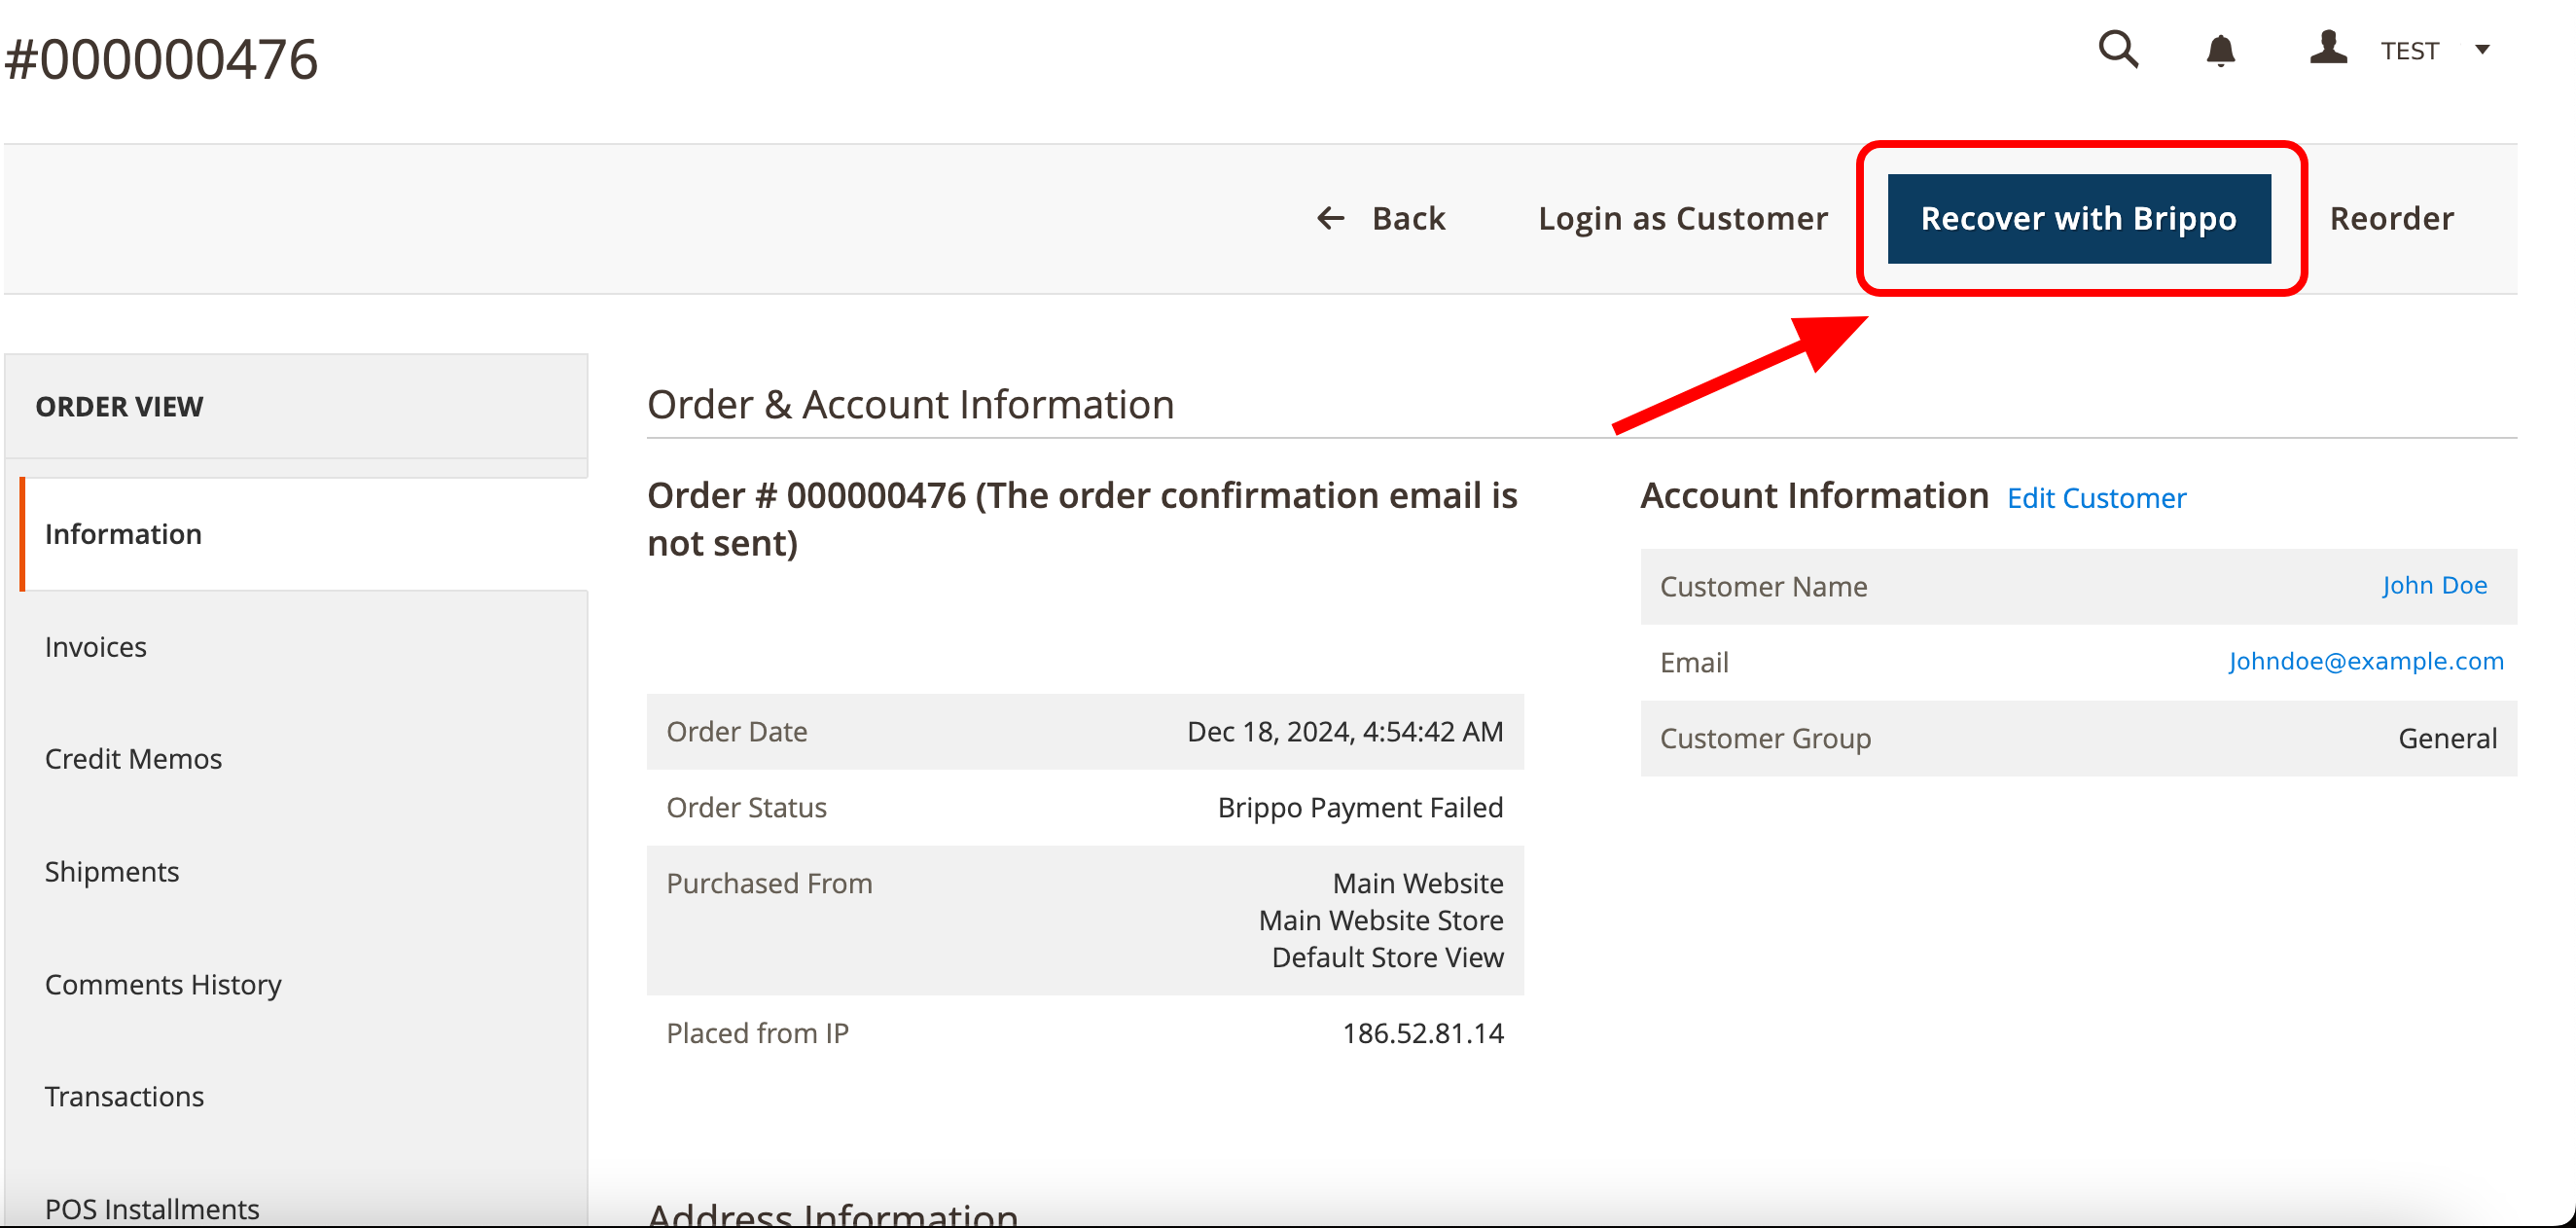
- If your Brippo account is not connected, an onboarding window will appear. Follow the prompts to log in.
- If already connected, you will proceed to the email setup screen.
Need help connecting your account? See our setup guide
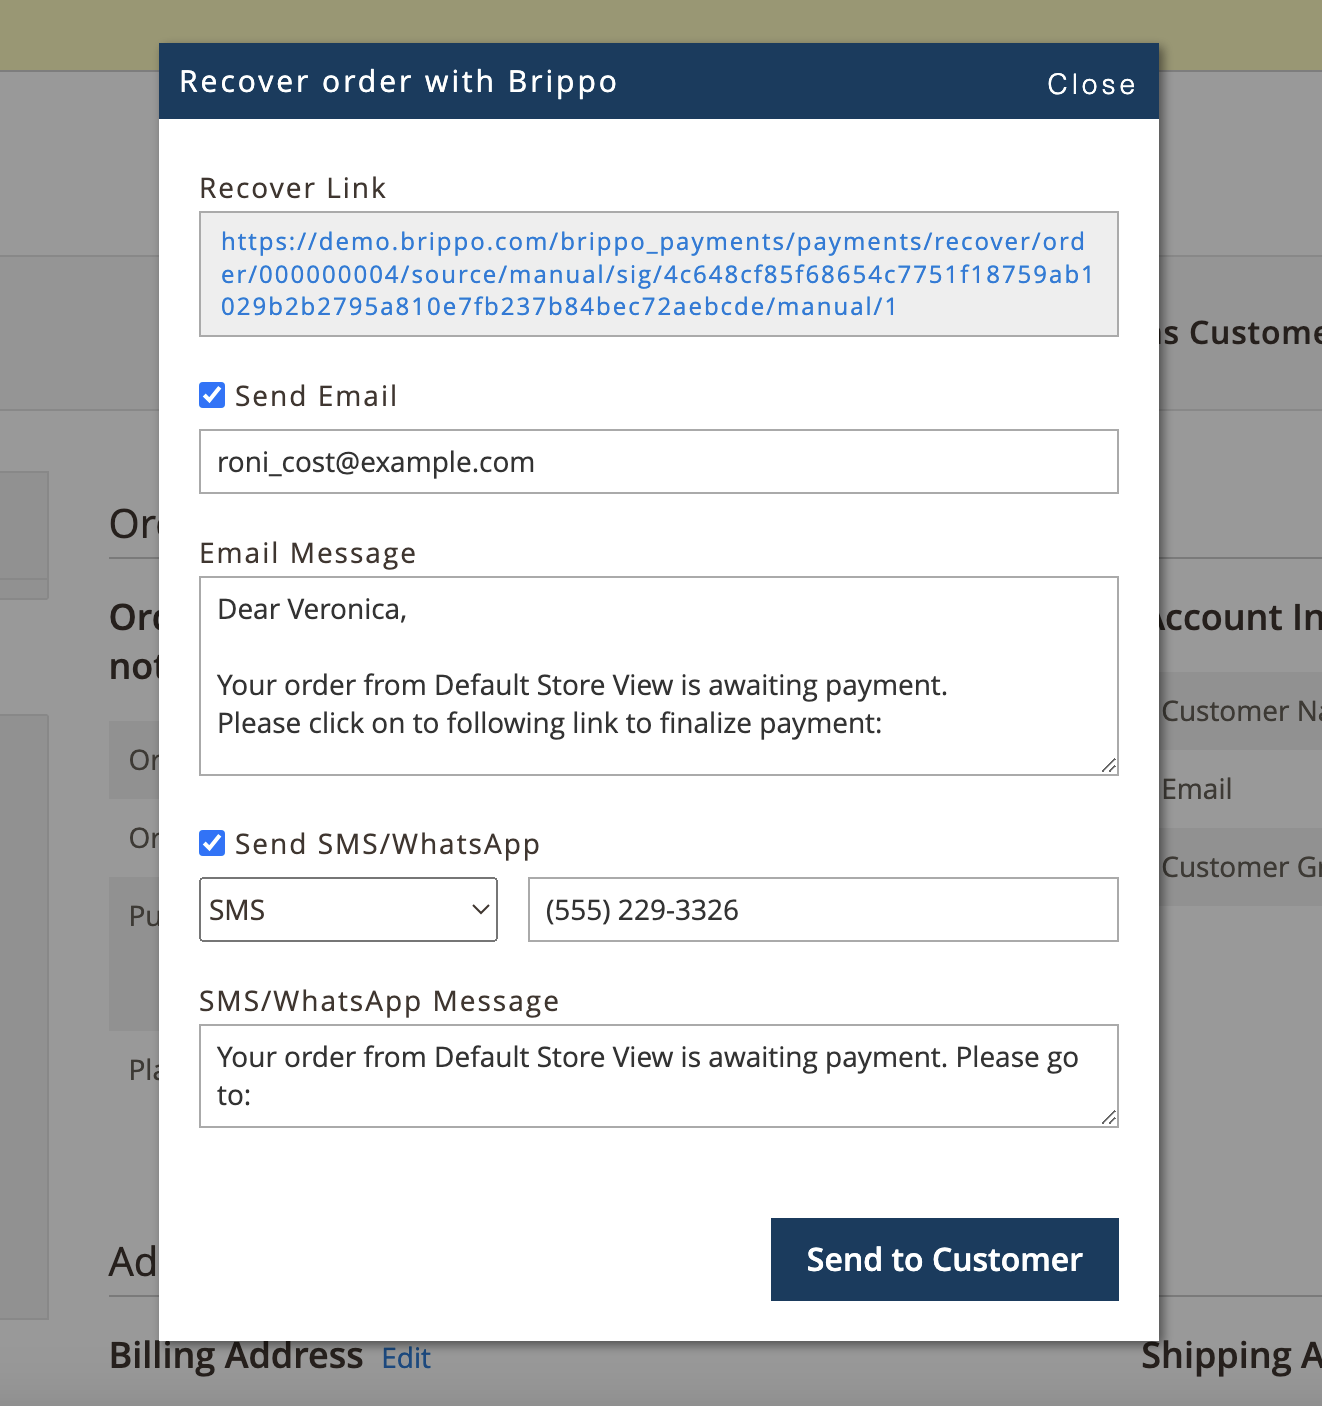
4Configure and Send the NotificationThe recovery panel displays the following fields:
- Recover Link — Generated automatically. This is the link sent to the customer.
- Send Email — Toggle to send an email notification. Pre-filled with the customer's email and an editable message.
- Send SMS/WhatsApp — Toggle to send via SMS or WhatsApp. Select the channel and enter the phone number.
Review the details and click "Send to Customer".
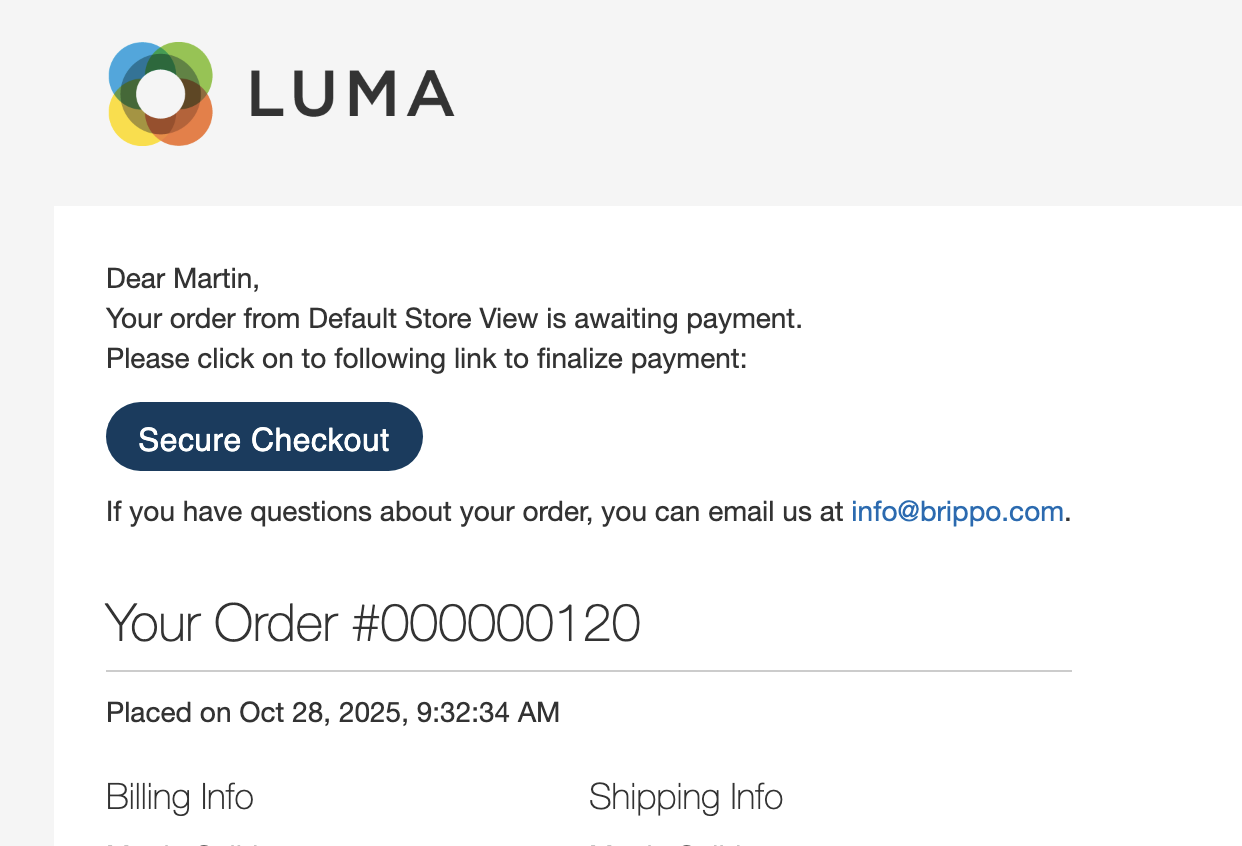
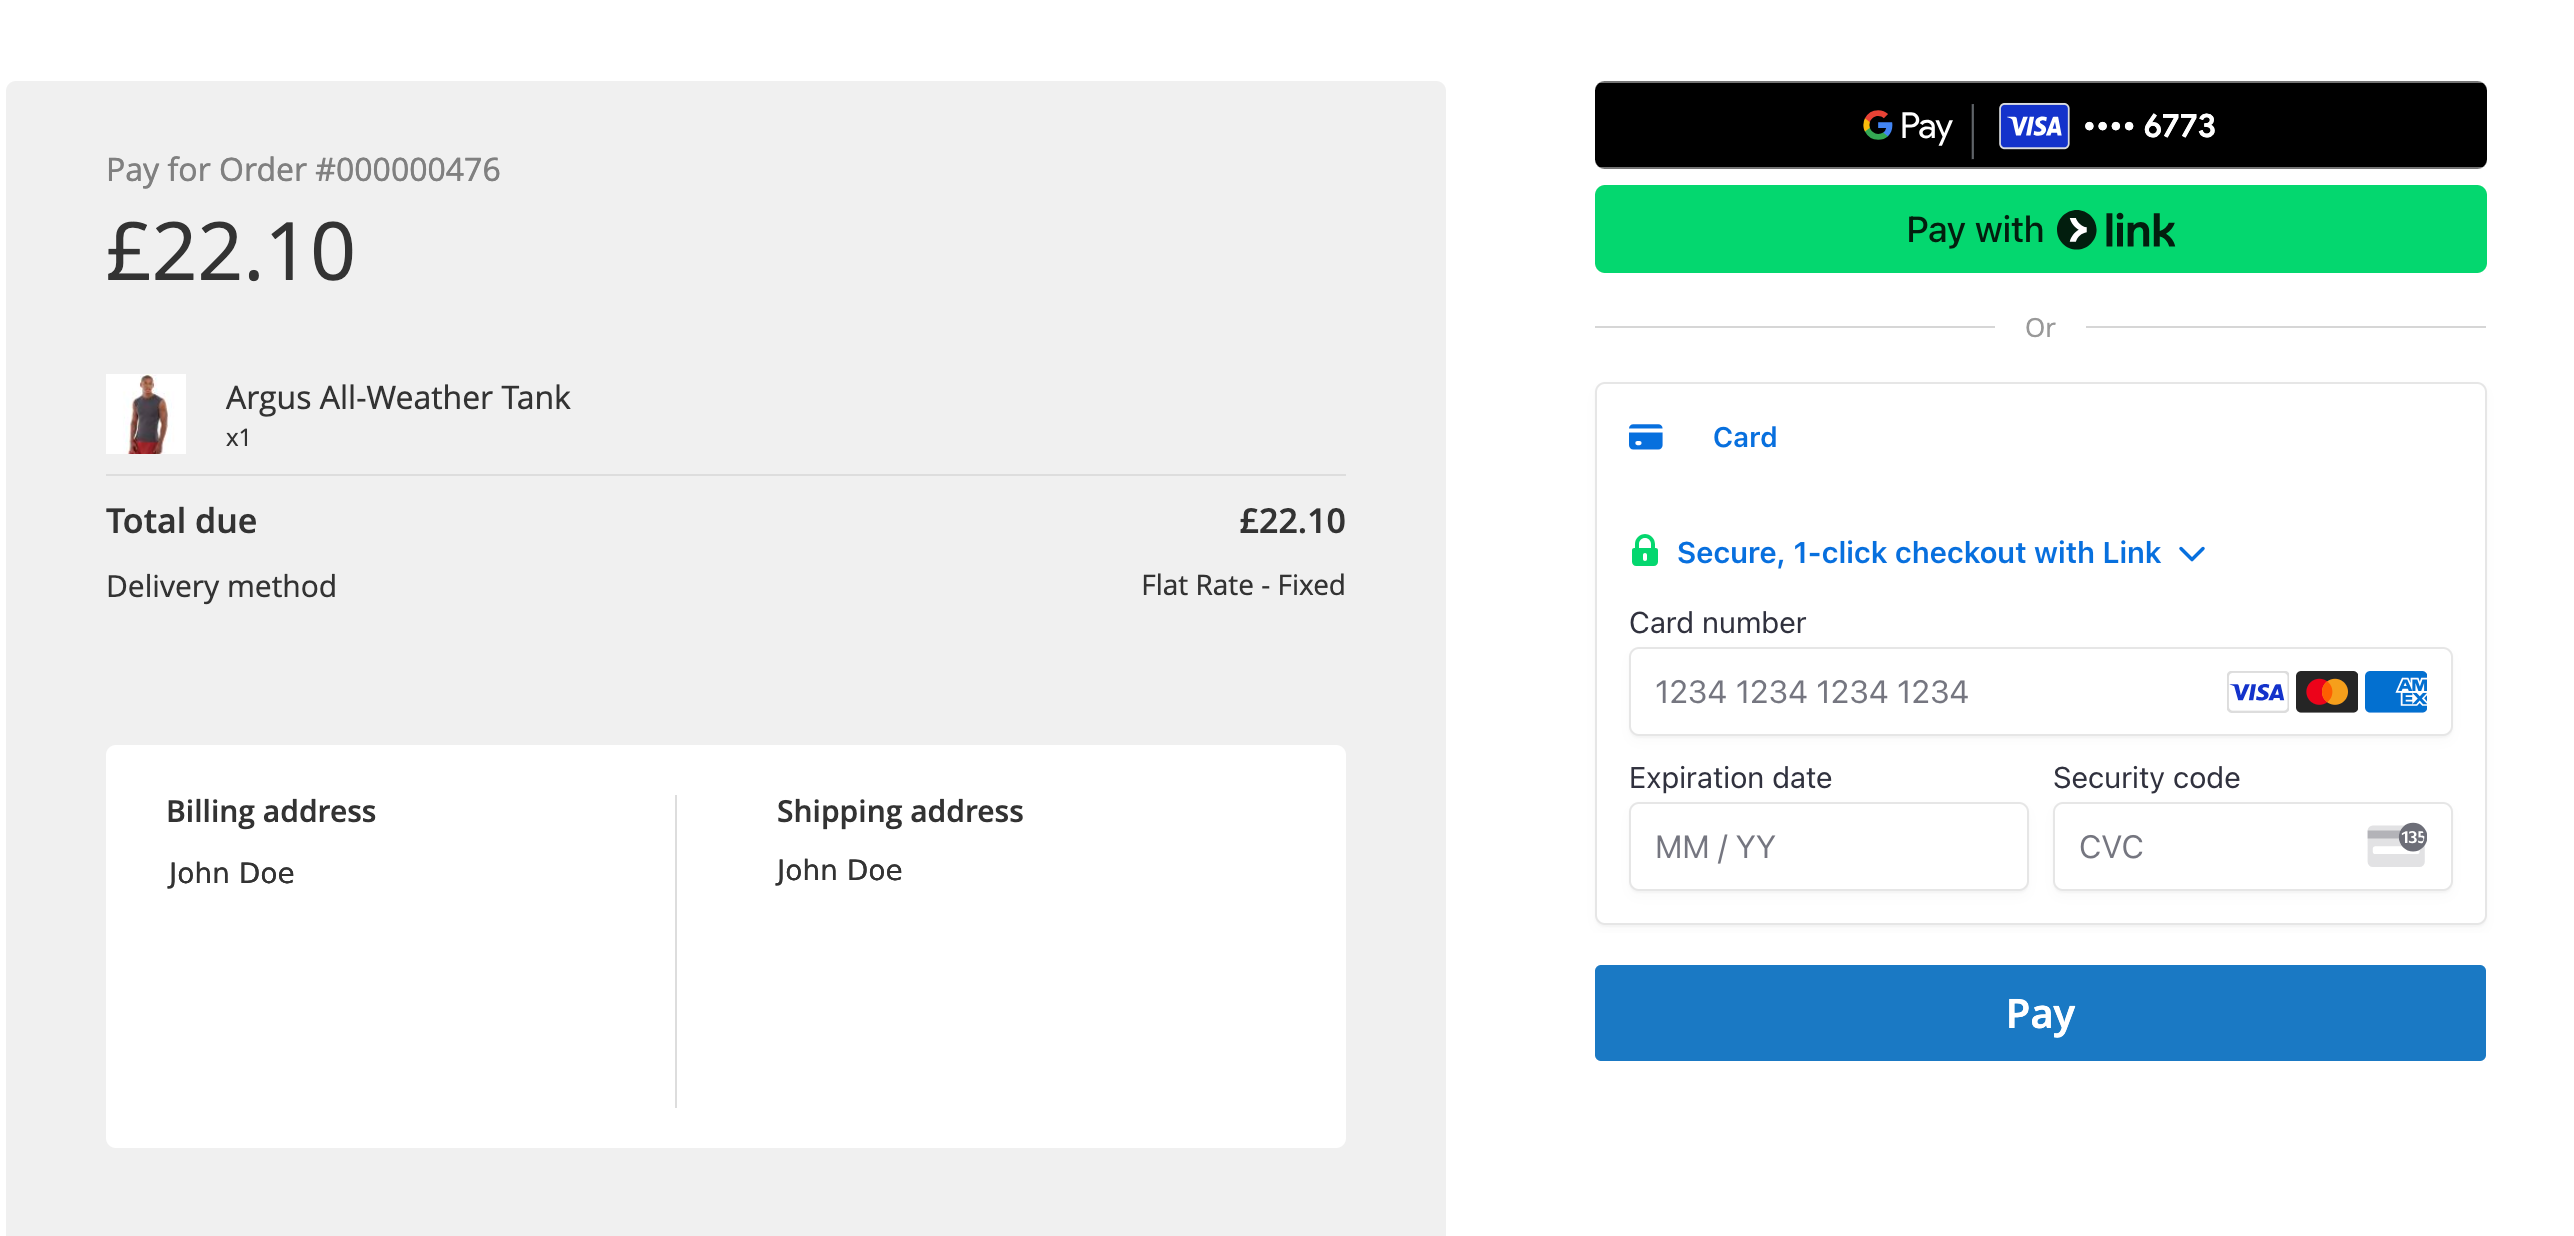
Customer Experience
After receiving the recovery notification, the customer clicks the payment link. They see a pre-filled checkout page with the original order details and can complete payment immediately.
User Guides
Soft Fail Recovery
The Soft Fail feature allows orders with certain payment errors to be created instead of being immediately rejected. When enabled, this functionality sends an email to the customer with a secure link to update their payment, while the order is placed on hold in Magento. This facilitates a smoother recovery process for failed payments without losing the order.
Step-by-Step Guide
1Enabling the Feature
Go to the Magento Admin Panel
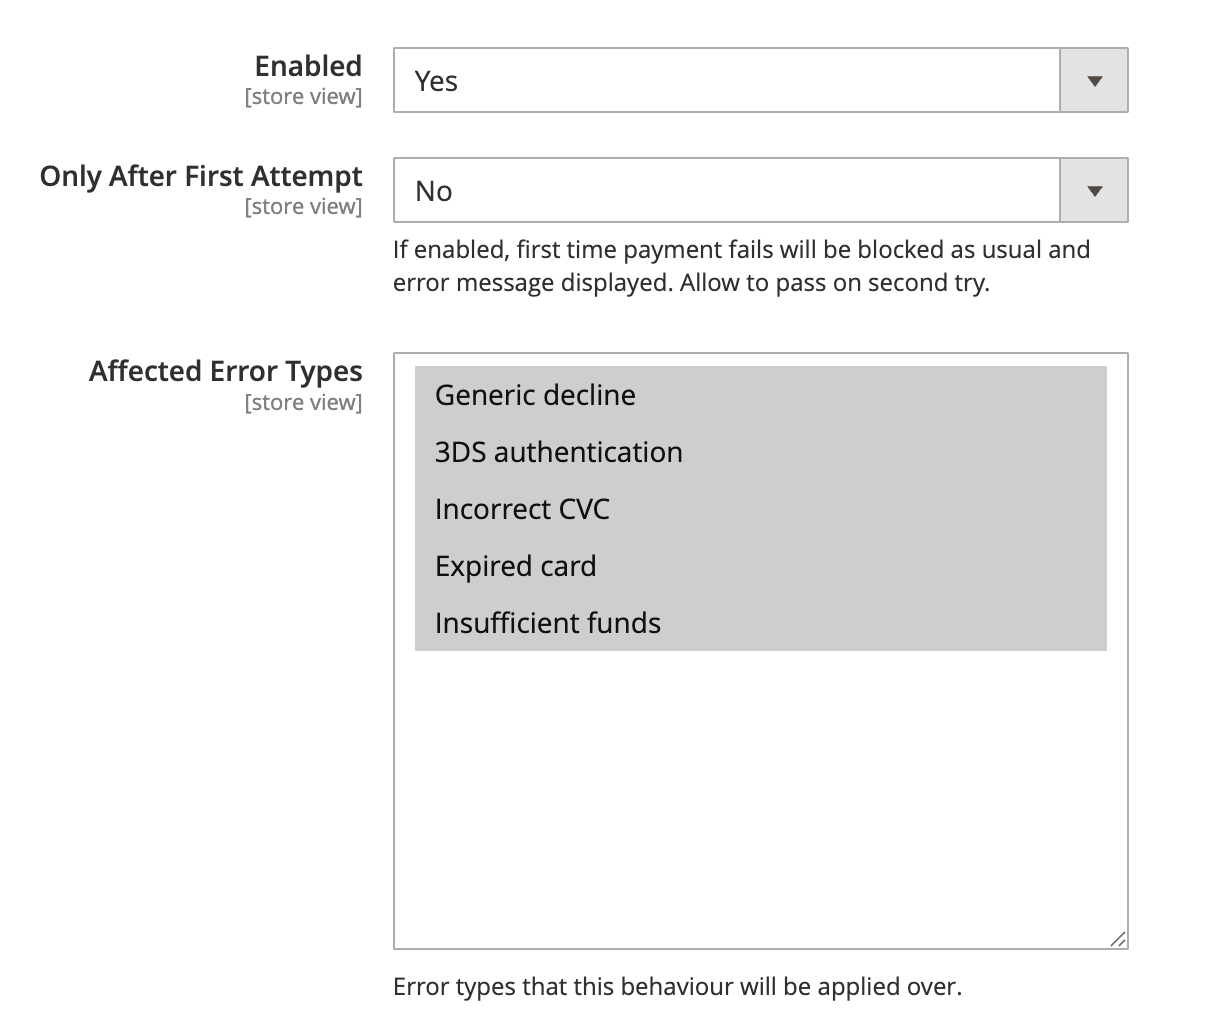
Locate the Brippo section and find the Soft Fail setting. This option is disabled by default. Set it to "Yes" to enable the functionality.
Once enabled, multiple configuration options will become available. The most relevant are:
- Only After First Attempt: When enabled, the first failed payment attempt will be blocked as usual and an error message will be shown to the customer. Soft Fail will only apply starting from the second attempt.
- Affected Error Types: A multi-select field where you can choose which types of payment errors (e.g., insufficient funds, card declined, etc.) will trigger the soft fail process.
Note: Several additional options are available once the feature is enabled. These allow for more advanced control over how and when soft fail should be triggered.
2Testing the Behavior
To verify that the feature is working correctly, you can simulate a soft fail scenario with a test card.
For example:
- Place a new order on the frontend.
- At checkout, use the following test card that simulates an "insufficient funds" error: 4000 0000 0000 0002
- Complete the required payment fields and attempt to place the order.
Expected result:
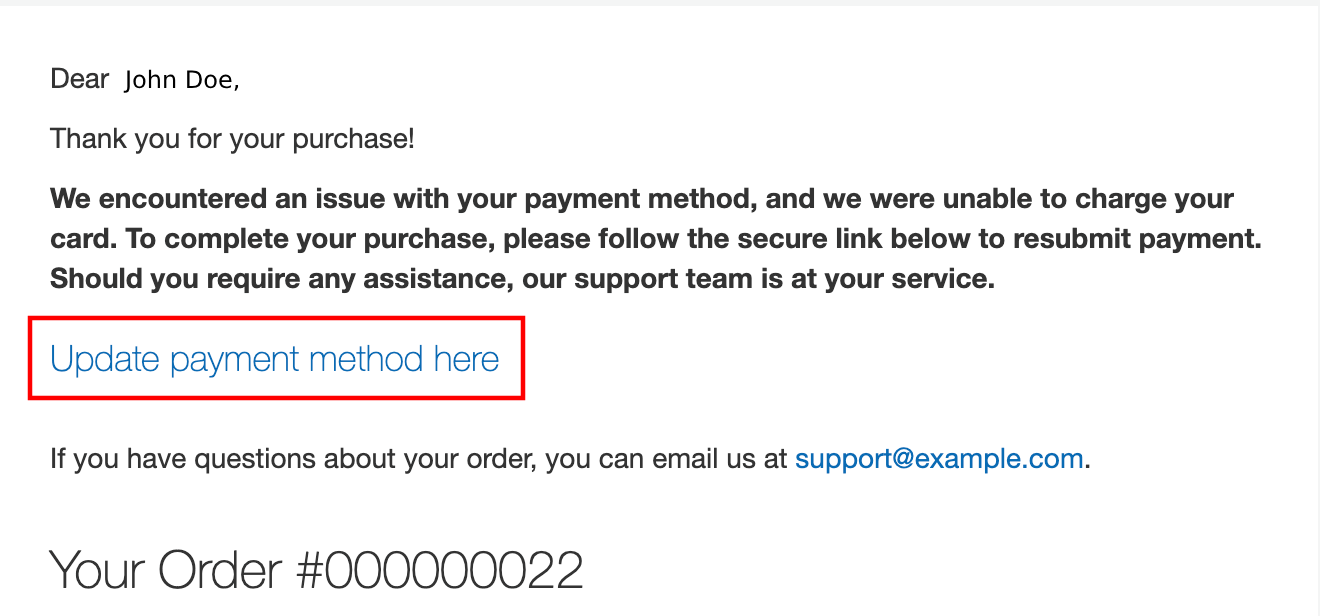
- The order is created successfully, despite the payment failure.
- The customer receives an email notification explaining the error and including a link to update the payment.
- In the Magento Admin, the order appears with the status: "Brippo On Hold - Trying to Recover", and remains in that state until the payment is updated.
Note: This is just one example using a known test card. Other card numbers or scenarios can be used, as long as the resulting error type is included in the “Affected Error Types” configuration.
Notes
- This feature helps retain orders that would otherwise be lost due to payment-related issues.
- Ensure your store's email sending configuration is correctly set up so customers receive the recovery instructions.
- Review all available configuration options under Soft Fail Recovery to tailor the behavior to your store’s needs.
If you're experiencing any issues or have questions, our support team is here to help.
Please don't hesitate to reach out to us via email [Contact Support], and we'll ensure prompt assistance to resolve your concerns.
Terminal from Backend
Brippo Terminal from Backend Guide
The Terminal from Backend feature allows Magento users to process payments via a POS terminal directly from the Magento backend.
1Prerequisites:
- Make sure your Brippo account is properly configured.
- Verify that your POS terminal is correctly associated in the Brippo Dashboard.
- The Brippo Payments module should be installed and configured in your Magento installation.
2Configuring the Brippo module in Magento:
- Go to the Magento backend and navigate to the Configuration section.
- Search for the Brippo Payments module settings and select the Brippo Terminal from Backend option.
- Make sure this option is enabled to activate the terminal payment feature.
3Creating an order in the Magento backend:
- Navigate to the Orders section within the Magento backend.
- You can create a new order or edit an existing one.
- In the order details, under the Payment Method section, you should see the Terminal from Backend option available.
4Selecting the Terminal MOTO payment method:
- In the Payment Method section, select Terminal MOTO as the payment method for the order.
- This will enable the payment to be processed through the POS terminal.
5Configuration in the pop-up:
- After selecting Terminal MOTO, a pop-up will appear with additional options:
- Terminal Selection: If you have more than one terminal connected, you will need to choose which one to use for processing the payment.
- Card input method: Select between the "Card Present" and "MOTO" options.
6Completing the payment on the POS terminal:
- After selecting the terminal and interface in the pop-up, the system will redirect you to the POS terminal to complete the transaction.
- The POS terminal will process the payment, and once completed, you will be redirected back to the Magento backend with the order correctly processed and the payment confirmed.
7Order Confirmation:
- If the payment was successfully processed, the order will appear in the Magento backend with an updated payment status.
- You can view the order details and payment status in the Orders section.
Developers
Brippo API
The Brippo API follows a RESTful architecture, delivering JSON-encoded responses and leveraging standard HTTP response codes.
Authentication
The Brippo API uses an API key to authenticate requests. You can view and manage your API key in the developer's section of your Brippo Dashboard.
Your API key carries many privileges, so be sure to keep it secure! Do not share your secret API key in publicly accessible areas such as GitHub, client-side code, and so forth.
All API requests must be made over HTTPS. Calls made over plain HTTP will fail. API requests without authentication will also fail.
Both your API key and Connected Account ID must be sent in all requests' headers, otherwise you'll get a 403 error code.
- curl https://api.brippo.com/... \
- --header 'api_key: *********' \
- --header 'account_id: acct_*********' \
- --header 'live_mode: true'
Support
FAQVersioning
Installed extensions versioning is displayed in the Magento config section:
Pro Tip: Clicking the versions text will download brippo_payments.log
Logs
Brippo Payments logs can be found under the var/log folder of your Magento instance.
For WooCommerce these can be found in the Wordpress Admin > WooCommerce > Status > Logs.
The log files are the following:
- brippo_payments.log
- brippo_payments_monitor.log
- brippo_payments_service_api.log
Some logs may only appear when you have enabled Debug Mode in your Brippo Payments configuration.
Google/Apple Pay modal not showing after clicking button
If you're seeing the Google/Apple pay button but the Modal is not loading after clicking it there are two possible causes:
- Another modal is already open in a different tab. When one modal is already open this results in the modal just failing to load. You will need to close the previous modal or tab where it was opening for the new one to load.
- An error may be occurring. Wallet errors are usually reported under the Inspect/Developer console. If you're experiencing an error we recommend to check the Console to see the errors clearly.
Google Pay button not showing
If the Google Pay wallet button is not appearing at all to you there are various possible causes:
- Integration is in LIVE mode and no live CC saved in browser
LIVE Google Pay requires a real CC to load properly, you can set one in your Google Chrome settings > Autofill and passwords > Payment Methods. - Integration is in TEST mode and no live/test CC saved in browser
In TEST mode you're required to have joined the Developer group that allows TEST Credit Cards. You can find more information about this on the Google Developers page. - Not using Chrome browser nor Android device
A Chrome browser or Android device is required to use Google Pay, if you are not using one of these the Wallets will not appear. - No Google Account logged in browser
Since Credit Cards are saved within the Google Account, if you are not logged into an account the Wallet will not load. - Order total is below GBP 0.30
If the transaction amount is less than the minimum allowed by Stripe, the Wallets will not load.
You can find the minimum required amounts for each supported currency on the Stripe Docs page. - No SSL / Invalid SSL
If the website doesn't have an SSL Certificate set correctly, the Wallets will refuse to load.
Stripe provides this page to check if there is any Credit Card saved in your browser.
You should see the wallet button below the title if there is any CC saved in your browser:
Apple Pay button not showing
If the Apple Pay wallet button is not appearing at all to you there are various possible causes:
- Not using Safari nor iPhone/iPad
Safari or an iPad/iPhone are required to use Apple Pay, when using Safari a device with Fingerprint may also be required to use the Wallet feature. - Domain not registered in our Stripe Account
Brippo Payments automatically verifies the domain when installing, you can check if this is correct in your Brippo Payments configuration > General > Domain Registration Status. - Order total is below GBP 0.30
If the transaction amount is less than the minimum allowed by Stripe, the Wallets will not load.
You can find the minimum required amounts for each supported currency on the Stripe Docs page. - No SSL / Invalid SSL
If the website doesn't have an SSL Certificate set correctly, the Wallets will refuse to load.
Same as for GooglePay, Stripe provides this page to check if there is any CC saved in your browser.
If you're still experiencing issues after verifying the possible causes, please refer to our known issues section or our get support section.Support
Known Issues
Below is a list of known issues that may affect the functionality or performance of the current system. These issues are actively being monitored, and workarounds or fixes are provided when available. Please review the details carefully to understand potential impacts and solutions.
Google/Apple Pay wallets not loading anywhere
If you have enabled Apple Pay or Google Pay, but you're unable to see it in any of the possible places these can load, such as the Shopping Cart, Minicart, Product Page or Checkout, we recommend you follow the steps below to verify everything is working properly:
1Verify the ConfigurationMake sure all Wallets of your choosing are enabled in your website Configuration, if you're using Magento it's possible that some of the Scopes for the website have the Wallets disabled, causing them not to appear for that specific scope.
Verify that you have selected the correct availability for the Wallets, when set as 'Always' these should always appear, when 'Auto' is selected the wallet will only be displayed automatically if the customer has a saved Credit Card in their browser.
Always check that the Layout Placement setting is empty, which should load the default placement for the Wallets, or instead using an existing css of your choosing, if the css has a typo or is set incorrectly it may cause the Wallet not to load properly.
2Make sure you have a saved Credit Card in your BrowserIf you have set the Wallets to load automatically, these will try to check for a saved payment method. If they're not loading, we recommend you to set a Credit Card within your Browser or device.
For Google Pay you may need to also enable an extra setting, in Google Chrome you should go to Settings > Autofill and passwords > Payment methods > Allow sites to check if you have payment methods saved.
For Apple Pay you will need to go to the Wallets & Apple Pay settings in your device and add any Credit Card, it should automatically allow Apple Pay to load in your browser.
3Make sure your website is available to the public.If your website is locked with an http auth, or the connection is not secure (such as the website not having a valid Certificate) then Apple Pay and Google Pay will not load in that website regardless of you having a Credit Card set within your browser.
Klarna not loading on checkout
If you're experiencing an issue where Klarna is not loading for some customers it's possible that the customer country is not the same as your own country.
If you’re based in the EEA, UK, or Switzerland, then you can transact with consumers across the EEA, UK, and Switzerland, provided the presentment currency matches the currency of the customer’s country. For example, a Swedish business can present in EUR to accept Klarna from a buyer in Germany.
If you’re based outside the EEA, UK, or Switzerland, then you can only transact with customers within your country, and the presentment currency must be the currency of your country. For example, an Australian business must present in AUD, and can only transact with buyers in Australia.
Apple well-known configuration
Normally, after installing and setting up Brippo Payments, the file apple-developer-merchantid-domain-association is automatically generated in the pub/.well-known folder of your Magento.
When this is properly generated you should be able to see the correct message below:
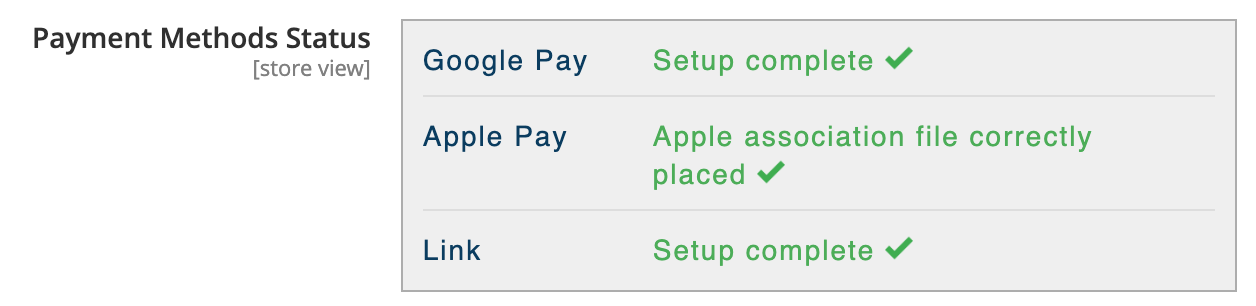
If it's not properly generated an error message similar to the one below will appear instead:
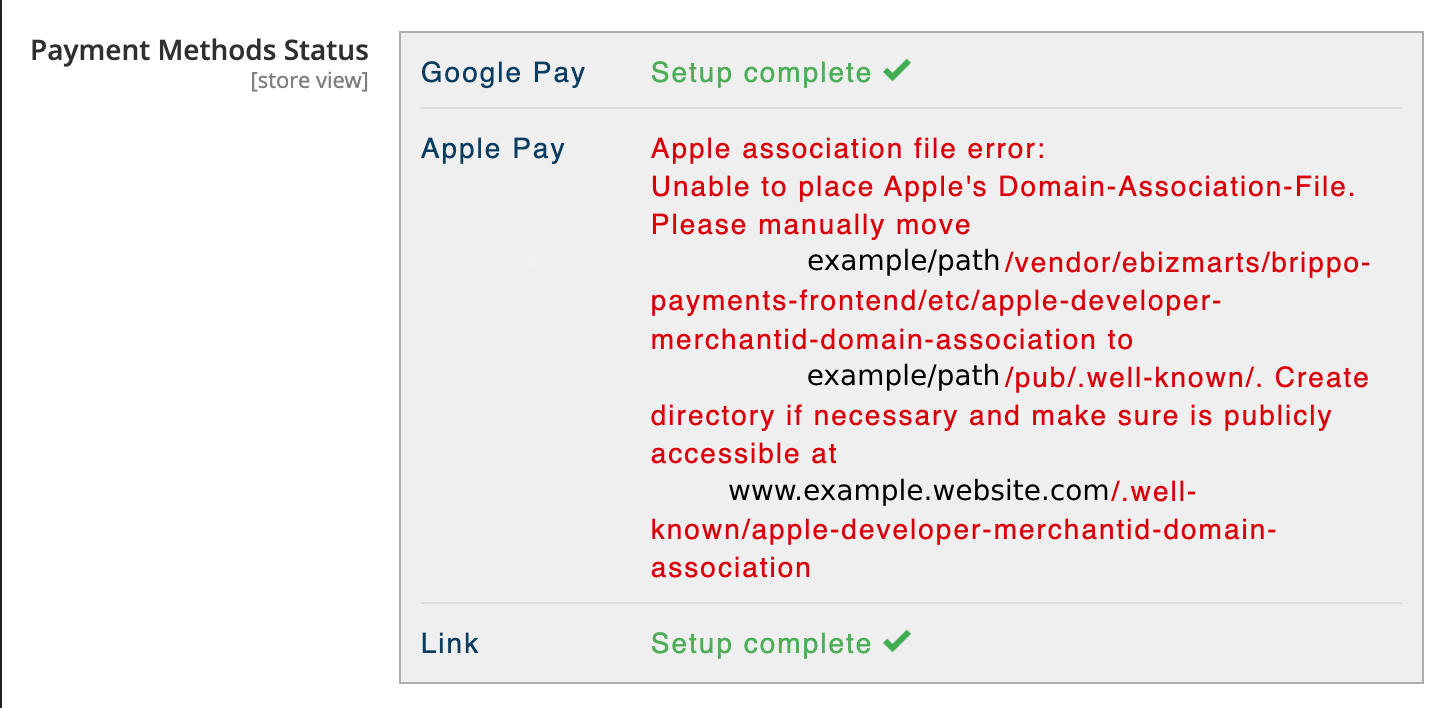
In this case, following the guide found in the error message should fix the issue, but in case you're experiencing a 404 error instead it's possible that the files were not generated properly and have to be manually set.
To do so we recommend following the video guide below to assist you with this process:
Support
Get Support
If you're experiencing any issues or have questions, our support team is here to help.Please don't hesitate to reach out to us via email [Contact Support], and we'll ensure prompt assistance to resolve your concerns.